While making GeekForge — a daily listing of interesting coding tasks — we researched several sources where you can learn AI and ML, and we thought it would be a good idea to share this list with you.
Two years have already passed since Mark Cuban said that if you don’t understand artificial intelligence, deep learning, and machine learning “you’re going to be a dinosaur within three years.” If you still didn’t dig yourself into that knowledge, especially if you’re a developer, then you’ve got about a year left to see whether he was right or not.
But luckily for you, if you are in fact interested in keeping your skills up to date, I hand-picked the best resources that are relevant today, regardless if you’re a beginner in the field or if you’ve already got your feet wet a long time ago. From video courses and books to interactive classes and coding tasks, within this list you will find the way to keep yourself out of the prehistoric era!
You can solve tasks independently or discuss them with the community. It’s the best way to educate yourself on new technology and build a portfolio of your completed tasks.
This course will introduce you to the basics of AI. Topics include machine learning, probabilistic reasoning, robotics, computer vision, and natural language processing.
UC Berkeley was born out of a vision in the State Constitution for a university that would “contribute even more than California’s gold to the glory and happiness of advancing generations.”
Learn the fundamentals of AI and apply them. Design intelligent agents to solve real-world problems including search, logic, and constraint satisfaction problems.
This course includes interactive demonstrations that are intended to stimulate interest and to help students gain intuition about how artificial intelligence methods work under a variety of circumstances.
Statistical approaches to processing natural language text have become dominant during the recent years. This foundational text is the first comprehensive introduction to statistical natural language processing (NLP) to appear.
This course explains why predictive analytics projects are ultimately classification problems, and how data scientists can choose the right strategy for their projects.
This book covers the field of machine learning, which is the study of algorithms that allow computer programs to automatically improve through experience.
This historical survey compactly summarizes relevant work on deep artificial neural networks, which have won numerous contests in pattern recognition and machine learning.
Grokking Deep Learning in Motion is a new live video course that takes you on a journey into the world of deep learning.
No matter what your prior experience is, the fact that you can learn the basics of the most important technologies in the world, like artificial intelligence and machine learning, to improve your coding skill set could place you above your peers in no time. Any of the following resources could be a starting point. Which one will it be for you? Ordering one of the books, enrolling in a university course, or maybe just signing yourself in for the daily tasks on GeekForge. Any of these options are better than doing nothing.
Did you ever wonder what’s the best tool to write an article, user manual, book, or any other kind of text document?
There are many options to choose from. Most people use a What-You-See-Is-What-You-Get (WYSIWYG) editor (also called a text processor), such as Google Docs, LibreOffice or Word. However, more and more people are writing their documents using another, less known option: a document markup language.
Why?
Should you, too, use a document markup language instead of a WYSIWYG editor? Let’s see.
Note: This article does not compare or evaluate different writing solutions/products. It will not tell you why product X is better than product Y. The purpose of this article is to point out general advantages of document markup languages.
WYSIWYG Editors
Offline or online WYSIWYG editors are often the best solution for non-technical people who occasionally write short or medium-size documents. Some websites have their own WYSIWYG editor integrated in the website, which makes it very easy to write formatted text.
WYSIWYG software is also the right choice for design-intensive publications where you want to have total control of the position, size, font, and other visual properties of the document’s elements, and you want to immediately see and trim the end result while working on the document. Examples of such documents are flyers, advertisements, party invitations, posters, etc.
Some word processors offer advanced features for particular tasks, such as writing a novel.
However, as said already, this article focuses on markup languages, so let’s move on and see why many people prefer them over WYSIWYG editors.
Document Markup Languages
Basic Concept
A document markup language consists of a set of rules and symbols (special characters) used to annotate plain text. The annotated text can then be read by a markup processor to generate styled documents (e.g. HTML, PDF, ePub, etc.) or any other kind of data.
For example, in some markup languages an underline (_) is used to emphasize text and render it in italics. Writing:
A _nice_ dog.
… results in: A nice dog.
Hence, markup code is just plain text intermixed with markup instructions.
A markup document consists of one or more text files that contain markup code.
There are many document markup languages to choose from.
Simple Example
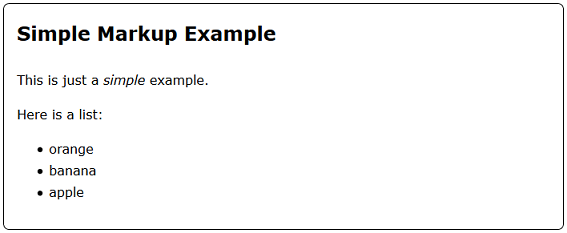
Suppose you create a text file with the following content (written in Markdown syntax):
# Simple Markup Example
This is just a _simple_ example.
Here is a list:
- orange
- banana
- apple
After the above text has been converted to HTML (by the markup processor), the result in the browser looks like this:
The style of the final document can be customized. This is often done by modifying a separate CSS files.
Ubiquitous Advantages
All document markup languages work like this:
A markup document consists of plain text.
Content and presentation are defined in separate files. The content file contains the text and markup instructions. The presentation file contains the stylesheet (e.g. a CSS file).
It turns out that these two simple concepts lead to an astonishing set of practical advantages, explained in the following chapters.
Distraction-Free Writing
When you write, you focus on content, not on presentation. You focus on what you want to say, instead of how it should be displayed or printed.
Moreover, you can customize your writing environment (editor) without worrying about the end result. For example, you can use a different font and a different number of characters displayed per line, without thinking about how this will affect the final document.
Thus, when you write, it’s easier to be in the flow (in the zone), which Wikipedia describes as a “mental state of operation in which a person performing an activity is fully immersed in a feeling of energized focus, full involvement, and enjoyment in the process of the activity”.
This is a big deal!
Choice of Editor
You can use your preferred text editor or Integrated Development Environment (IDE) to write your document. You are not tied to a specific editor. There is no vendor lock-in.
Imagine a team of writers collaborating on the same document. Everybody just uses the text editor they like the most for the task at hand. For example, Bob and Alice are working on a new user manual, but Bob uses Emacs on Linux, while Alice uses Notepad++ on Windows.
Some high-end text editors provide incredibly powerful features (some out-of-the-box, some via extensions) and are highly customizable, so that you can setup your ideal writing software. As a result, you have a more enjoyable writing experience and you are more productive than with a WYSIWYG editor.
Choice of Presentation
Because content and presentation are defined in separate files, you can change presentation by simply choosing another stylesheet (e.g. CSS file) from a predefined set, and adapt it if needed. If your document is read on different reading/printing devices, you can use different presentations for each device.
Sometimes the same stylesheet is used for many documents. Thus, presentation remains consistent over large sets of documents. Moreover, global presentation changes can often be done in a matter of seconds, because only one file needs to be changed.
Choice of Transformation
Depending on the language and tools you use, you can transform your markup code into final documents of different formats, such as HTML, PDF, ePub etc.
And if your tool can’t do it, there is Pandoc, the Swiss-army-knife for document conversions. At the time of writing, Pandoc can convert not less than 31 input formats into not less than 49 output formats. That’s 31 x 49 = 1,519 transformations supported by one tool.
Choice of Text Tools
There are many tools and online services available to handle plain text files — some possibly pre-installed on your PC. You can use them to handle your markup documents, in whatever way you want.
Examples:
You can use a version control service such as Github, Gitlab, or Bitbucket to track changes and issues, collaborate on documents, synchronize documents on different devices, and use all other powerful features.
To get an idea of free tools for technical people, look at this List of Unix Text Processing Tools. Nowadays, you can also easily install these Linux tools on Windows.
Customized Tools
Reading and writing plain text files is very well supported in most programming languages. Therefore it is easier for programmers to develop customized tools to explore and manipulate documents.
For instance, pre-processors and post-processors can be created to add features and automate recurring tasks. A concrete example would be a tool that displays a sorted list of website links used in your document and checks for any broken links.
Moreover, it is easy to programmatically create documents. For instance, a product catalog or a reference manual could be created automatically based on structured data stored in a database.
Portability
As content and presentation is defined in plain text files, documents are portable among different operating systems (Windows, Unix/Linux, macOS, etc.). All operating systems have very good support for text files.
Language-Dependent Advantages
In this section we’ll look at additional advantages found in some document markup languages.
File Splitting
Some markup languages allow you to split a document into different files.
For example, each chapter of a book (and maybe also each sub-chapter) can be stored in a different file and in a directory hierarchy of your choice.
This can be a game-changer when a team collaborates on mid-size or big documents, because it makes editing, reorganizing, and collaborating much more convenient.
Semantic Markup
Some document markup languages support only presentation tags. The better breed of them prefer semantic tags over presentation tags. This means that, when you use markup, you specify the meaning of a piece of text. You do not specify how the text will be displayed or printed. You define the What, not the How.
A first benefit is that this leads to much more flexibility in the rendering process.
Suppose your text contains several warning messages that need to stand out. If you use a markup language that supports only presentation tags, you could decide to aggressively display a centered text in red on yellow, like this:
This works well if the warnings are displayed on a color screen. But if the document is printed on a color-less printer, or displayed on a black-and-white e-ink device, the result is a mess.
On the other hand, in a markup language that provides semantic tags, you would simply adorn your warnings with a warning tag. The stylesheet used in the conversion process specifies how all warnings are displayed. Hence, you can globally change the presentation of all warnings for a given output device by simply changing one entry in the corresponding stylesheet.
For example, in the stylesheet used for e-ink devices, you could specify to display the warnings in italics with a bigger font. Moreover, if you have other messages that have to stand out, like errors or tips, you can use different, specific tags and handle them separately, without any interference.
A second advantage is that semantic markup opens the door for searchable documentation databases. You can query your markup code and extract useful information. For example, you could create a tool to count the number of warnings contained in the document or extract and save the warnings in a separate file for further exploration.
Parameters
Advanced markup languages support parameters embedded in the markup code. You first define a parameter by assigning a value to a name (e.g. my_email=foo@example.com). Then, later in the document, you use the parameter name, instead of the value. If the value changes later, you just need to change it in one place, which is easy, fast, and less error-prone.
This is an application of the important Don’t Repeat Yourself (DRY) principle. It improves maintainability, productivity, and reliability. It is useful for all kinds of recurring text and markup attribute values, especially if they are subject to change. For example: your email address, the price of your product, the name of your dog, or whatever.
Advanced Features
Here is a brief summary of additional powerful options:
Real-time preview
Sometimes it is convenient to see a preview of the final document (e.g. a HTML page) while typing the markup code. As soon as you edit the markup code, you can immediately see the effect, without the need to re-launch the markup processor. Some editors support this kind of immediate feedback out-of-the-box or by plugins. For example, you type the document in one window, and you see the real-time preview in an adjacent window.
You can think of this as a markup editor with WYSIWYG support.
Public API
A public Application Program Interface (API) allows programmers to programmatically execute, change, or extend the markup processor’s operations.
At the bare minimum, an API enables other applications to convert documents. For example, a web server could read markup code stored in a file or entered by the user and convert it to HTML on-the-fly, by using the API. This could be used, for instance, to provide an online markup tester, so that people can try out snippets of markup code, without the need to install anything on their PC.
More advanced APIs can provide additional functionality, such as:
Change the rendering of some tags
Add more tags to the language
Add more output formats to the converter
Create a markup document programmatically, by retrieving data from different sources.
Hooks (also called extension points). Hooks allow programmers to execute functions when specific events occur. For example, once the Abstract Syntax Tree (AST) (i.e. tree structure) of the document has been created by the markup processor, an extension point can programmatically explore the AST to extract and report useful information, or even change it to implement the most extravagant requirements.
Templates
Templates allow you to customize or redefine the rendering of specific tags, by modifying text files containing the template code.
User-defined tags
You can use configuration files to extend the language and add your own tags to the markup language, and specify how each tag is rendered.
Processor Directives
Processor Directives are special instructions inserted in the markup code and interpreted by the markup processor.
Suppose somebody writes a test sheet for students. The sheet contains instructions that should only be visible for teachers. In that case, a directive could be used to display specific text blocks only if the document is printed for teachers.
Further readings
The advice of a technical writer who uses an “über-powerful text editor” (spoiler: Emacs) and doesn’t like the mouse: How and Why to Dump Your Word Processor
Should you use a WYSIWYG editor or a markup language?
As so often, the answer depends on your use case.
However, as demonstrated in this article, in many cases a document markup language is the better choice, because you can benefit from considerable advantages. In a nutshell:
When you write, you can focus on writing, because you don’t have to think about presentation, and you can use your preferred text editor with your customized setup.
Your writing environment is more flexible and powerful, because you have a lot of options to handle plain text files.
It is easier to automate and customize your writing process, which saves time and reduces errors.
Ultimately, a well-designed document markup language makes your writing experience more enjoyable and increases your productivity.
What’s your own experience? Please share it by leaving a comment.
from freeCodeCamp https://medium.freecodecamp.org/the-advantages-of-document-markup-languages-vs-wysiwyg-editors-829dc8362219?source=rss—-336d898217ee—4
Venture funding in female-founded businesses has remained painfully stagnant at only 2.2 percent for two years in a row. Insiders expect that figure to begin trending upwards, albeit slowly.
A new survey of female founders reveals that a mere 8 percent feel supported by the venture community. The sluggish growth of female leadership in venture capital is considered the largest culprit — nearly three-quarters of U.S. firms lack even a single female partner. Many junior female investors burn out before reaching senior ranks, frequently citing a shortage of support as a factor. But now nearly 1,000 female VCs globally are working together on a fix.
The Global Women in VC Directory is the largest self-reported directory of women investors at institutional, corporate, and family offices on record. It includes VCs across over 600 funds from more than 25 countries. The private directory is password protected and for women currently in the venture community only, but the co-creators of this initiative — Sutian Dong, Partner at Female Founders Fund, and Jessica Peltz-Zatulove, Partner at MDC Ventures — have just released some key findings from the group.
Common stages that female VCs invest in — and why
By a huge margin, women predominantly invest in the early stage, with 71 percent investing in Series A and 66 percent investing at the seed stage, according to data collected through the directory. Meanwhile, when it comes to Series B and growth stage deals, significantly fewer women invest — 44 and 30 percent, respectively. The gap widens at the partner level — just 20 percent invest at the growth stage and 37 percent at Series B (compared to 75 percent investing at the seed stage and 68 percent at Series A). The problem is clear: When fewer women are at the table and — more specifically — writing checks, fewer women-led companies get funded. Looking at these figures, it’s not surprising so few female founders successfully raise Series B and growth rounds.
The sectors women invest in
The top sectors women invest in are enterprise, healthcare, fintech, and consumer products, with about 20 percent of women investors active in each of these areas. About 15 percent invest in SaaS and 14 percent in AI/machine learning, followed by marketplaces (10 percent), education (10 percent), and commerce (10 percent).
The top industries vary widely when reviewing deal flow among partners vs. those at more junior levels. For instance, the number one sector women partners invest in is healthcare. They’re also more likely to focus on marketplaces, biotech, education, AI, and commerce than their more junior counterparts. Junior VCs, on the other hand, show a greater preference for fintech, transportation, agtech, insurtech, and AR/VR than partners.
A path towards more women in leadership
Thirty-seven percent of women in VC hold a partner or general partner title. This leaves a huge pipeline of VC talent with upward mobility potential in need of support and mentorship. Eleven percent of women are currently at the principal level — most likely on a track towards partner or building a fund of their own. A larger chunk, 16 percent, is made up of associates, a role that most frequently churns out of VC. Further, six percent of women hold analyst roles, while senior associate, VP, and investment director positions are held by just over 10 percent of women in VC combined.
“We have to uplevel both support for junior talent to reach the partner level and funding initiatives for women to increase the number of first-time female fund managers globally. It starts with more women not only speaking up, but working together to identify solutions,” Dong told me.
Markets attracting the most female VC power
Most women in VC work in San Francisco (29 percent) and New York (27 percent), followed by London (9 percent), Boston (5 percent), and Chicago (4 percent), according to the directory’s data. While 36 percent of all female partners are unsurprisingly based in the Bay Area, the New York venture market is bursting with junior female talent — 32 percent of all non-partners in VC reside there. SF follows with 25 percent. Some global markets for emerging junior talent are Toronto, LA, DC, Sydney, Berlin, Singapore, St. Louis, Amsterdam, Bangkok, and Tel Aviv.
“This research demonstrates that women are betting big on technical businesses and investing in a wide range of markets. It debunks any misconceptions that women predominately invest in consumer or commerce companies,” Peltz-Zatulove told me. Since the women in the directory hail from 74 cities and 29 countries, the community “has become a gateway to a larger support system when there’s often a shortage of other women investors in their local market, it’s helping keep them in the industry instead of churning out.
The directory of women VCs does more than shine a light on these statistics, though, say Peltz-Zatulove and Dong. They see it as a community that can effect change. “[It enables] women VCs to better connect with each other to collaborate, share deal flow, and foster a strong sense of community,” said Dong. “The broad access to real-time industry data and trends [in that community] is a powerful added benefit. It can be used to identify growth, detect gaps, and understand exactly where and why women are still hitting major roadblocks within venture.”
Beck Bamberger is an investor and founder of Bam Communications. She contributes regularly to Forbes, Fast Company, and AdAge.
from VentureBeat https://venturebeat.com/2019/03/26/1000-female-vcs-are-building-the-worlds-largest-self-reported-directory/
In design thinking (as well as in any product-development process), it is important to define the problem you want to solve before spending time and resources on generating possible solutions. (A great solution to the wrong problem will fail.) This approach maximizes resource use and decreases the likelihood for friction and disagreement in the prototyping, testing, and implementation stages.
User need statements, also often called problem statements or point-of-view statements, are the primary tool in the second stage of design thinking — the define stage; they align different points of view before moving forward into ideating. It doesn’t matter which term you choose to use (user need, problem, or point of view)— it only matters that you remain consistent throughout your organization.
Definition: A user need statement is an actionable problem statement used to summarize who a particular user is, the user’s need, and why the need is important to that user. It defines what you want to solve before you move on to generating potential solutions, in order to 1) condense your perspective on the problem, and 2) provide a metric for success to be used throughout the design thinking process.
Most importantly, the purpose of user need statements is to capture what we want to achieve with our design, not how. They help advance our presumptive solutions from specific features (such as a button or other UI implementation) towards deep insights about the problem that the user needs to solve. Simplistically, user need statements encourage us to see users’ needs as verbs (that is, goals and end states) instead of nouns that describe solutions. For example, users don’t ever need a dropdown (noun); they need to see the choices that they can make and select one of them (verb). They don’t need a dashboard (noun) — they need to digest varied information in one place (verb). The nouns are possible solutions to users’ needs, but they are not the only solutions. If we focus on these nouns, we run the risk of ending up with suboptimal designs. The entire purpose of ideation is to explore ideas, so don’t lock yourself down prematurely by selecting the solution too early.
Format: 3-Part
Traditional need statements have 3 components: 1) a user, 2) a need, and 3) a goal. These are then combined following the pattern [A user] needs [need] in order to accomplish [goal].
For example, [Alieda, a multitasking, tech-savvy mother of 2] needs [to quickly and confidently compare options without leaving her comfort zone] in order to [spend more time doing the things that really matter].
The user should correspond to a specific persona or real end-user segment you’ve done research on. It is helpful to include a short tagline that helps remind everyone who the user is, especially if the need statement will be used by a large team or by stakeholders who are removed from research:
Alieda, a multitasking, tech-savvy mother of 2
Carol Ann, a researcher with an appetite for adventure
Sam, a connected YouTuber in the city
The need should be real, should belong to users, should not be made up by the team, and should not be phrased as a solution. Stay away from features, interface components, and specific technology. For example, possible goals may be:
To quickly and confidently compare options without leaving her comfort zone
To meet and socialize with others, while maintaining family balance
To get validation from others when making an important decision
Keep in mind: users do not always know what they need, even though they may say so. A famous quote, attributed to Henry Ford, says, “If I asked people what they wanted, they would have said faster horses.” It is your job to understand the real need of your user.
The insight, or goal, is the result of meeting that need. It should be rooted in empathy. Look beyond the obvious — what will this solution allow the user to accomplish? For example, think about the user’s hopes, fears, and motivations:
Spend more time doing the things that really matter
Feel confident having new friends over for dinner
Pursue a lifelong dream that has always taken the back seat
Benefits
The cognitive and collaborative process of making a user need statement and the finished statement itself have important benefits for your team and your organization:
Capture the user and the need
A need statement distills your knowledge of the users and their need into a single sentence. It is especially helpful in condensing research insights (survey answers, user-interview transcripts, empathy maps) before looking for solutions — thus increasing clarity and allocation of time.
Align the team along a concise goal
A user need statement is a concise, articulate way of communicating your user and their need across multiple team members and stakeholders. Once created, it should act as a guiding force — alignment throughout a project of what you and your team seek to solve.
Identify a benchmark and measurement for success
User need statements, if properly crafted, have the added benefit of providing a metric for success prior to the onset of ideation, prototyping, and testing. Use the insight, or goal, and ask yourself: how will we know if we accomplish this? Then, as you create your needs statements, establish corresponding metrics for success. This approach will decrease friction down the road and set a clear bar for your team or organization.
Process
1. Set the scope
User need statements can be applied to varying scopes. It is likely you will have multiple need statements within one project: an overarching, umbrella statement and subordinate need statements that articulate smaller goals for that user type. You should scope your need statements based on your current project needs.
Start by creating an ‘umbrella’ or ‘parent’ (broadly scoped) need statement when your goal is to:
Establish alignment for a long-term vision or roadmap
Define the problem statement at the onset of a product’s conception
A ‘parent’ need statement will likely have a broad goal that will overarch each component of the project. For example, the need statement from above could be regarded as a parent goal:
[Alieda, a multitasking, tech-savvy mother of 2] needs [to quickly and confidently compare options without leaving her comfort zone] in order to [spend more time doing the things that really matter].
Conversely, it is beneficial to start with a ‘child’ (small-scope) need statement if your goal is to:
Increase your comfort and fluency with need statements
Create personal benchmarks for success as an individual practitioner or UX team of one
Align the team on a user need within a larger product or service
Set a goal for a week-long sprint
A ‘child’ need statement will have a specific need and a goal that can be satisfied in 1-2 releases:
[Alieda, a multitasking, tech-savvy mother of 2] needs [to schedule an installation appointment] in order to [coordinate her family’s schedule ahead of time and prevent additional stress].
2. Conduct (or gather existing) qualitative research
Using your research, generate candidates for the 3 variables in your needs statement: a user with tagline, a need, and an insight. Don’t worry about creating the perfect statement from the onset; instead, think about each variable in isolation, then start to mix and match. Combine different pairings until you have a statement that represents the user’s real need.
First time practitioners are often apprehensive to include anything that is not a verbatim finding from research in their need statements. However, it is important to remember that our users will not always directly say or even know precisely what they specifically need or why. Instead, it is our job as user-experience professionals to use the research, combined with our expertise, to derive insights. As Rebecca Sinclair, of Airbnb, reminds us “you are the designer. Your job is to be a deep, empathetic listener and to imagine ways to solve their problem. Take responsibility to create something better than the customer could have imagined. They are the inspiration, but you are the creator.” Practice this by continuing to ask yourself why:
What does the user care about?
Why is this important to the user?
What emotion is driving the user’s behavior?
What does the user stand to gain?
4. Critique your statement
Once you have a working statement, begin critiquing and iterating on it. Mix and match, altering the language and combining different inputs. Challenge yourself with questions:
Are you thinking about your users’ needs as a verb, rather than a noun?
Does this need statement launch you into ideation?
Does the statement capture the nuances of what solving this need would mean in your user’s life?
5. Add methods of measurement
Upon landing on a final need statement, identify how you can measure its success. If you were to satisfy that need for your user, how would you know? Common methods of measurement include:
User Need Statements in Practice
A user need statement must be used throughout the product-development cycle in order for teams to reap the full benefits. Below are examples of when and why it is helpful to create and refer to a user need statement:
Example 1: Research
When: Analyzing and sharing a key finding from a user interview
How: After completing individual research analysis, create a user need statement on your own. Compare this user need statement to that generated by peer researchers. Combine and remix the various needs statements until you have a user need statement that is the best objective representation of the interview insights.
Why: To help you condense the essential from research into a single actionable statement that is easy to digest, share, and distribute
Tip: Directly compare need statements for different users to articulate the differences between user segments.
Example 2: Project Kick-off
When: Identifying goals at the beginning of a new-release cycle or sprint
How: Create the user need statement in a collaborative, hour-long workshop. Ask participants generate needs, then insights for a particular user. Prompt them to mix, match, and rewrite until they agree on one statement.
Why: To force alignment and prioritization across a multi-disciplinary team in a clear, articulated statement that team members can unite behind; also to mitigate objections or concerns later on in the release cycle
Tip: Have each team member sign or initial the statement to indicate they bought in and aligned behind the release goal.
When: Reviewing the success of an added feature or capability after it has been implemented
How: Begin a retrospective by returning to the user need statement created at the onset of the project. Ask participants to rank their perception of success against the statement.
Why: To compare the effectiveness of what was implemented, against the original purpose (A user need statement should be accompanied by a clear definition of what success means —for example, higher click rate, more return purchases, etc.)
Tip: Compare self-evaluations of success to analytics and user data of the new feature or capability. Identify relationships and themes, and use the insights for the next release.
User Need Statements vs. Development Tasks, Stories, and Epics
At a glance, user need statements seem to be like other structures commonly used product development. Development tasks, user stories, and epics often take the same format: “[a user] needs [a way to do something].”
To better highlight the difference, let’s compare a need statement with a development statement:
Need statement:
[Alieda, a multitasking, tech-savvy mother of 2] needs [to quickly and confidently compare options without leaving her comfort zone] in order to [spend more time doing the things that really matter].
Development statement:
A user needs a comparison table in order to see different prices.
The need statement gives us a specific user, something that the user needs to do, and a clear, empathetic insight into why Alieda has that need. The development statement presents a generic user and a solution (comparison table), with an insight that explains what the solution will support, and is not based on research.
Both have their time and place. If you are early in the design thinking process, you should be pushing yourself to generate quality need statements that can act as a pillar throughout the ideation and prototyping. Use development statements as a mechanism for implementation, once you know what you want to address.
If you currently work with epics, stories, or tasks similar to user need statements, return to them and challenge yourself: can you make the user more specific? If you were to turn the noun into a verb, how would that need change? What is the deeper insight?
Conclusion
As their name suggests, user need statements articulate the end user’s problem we are going to solve, and why it is worth solving. They are a tool to help us stop thinking about users’ needs as nouns and start thinking about them as verbs. When done collaboratively and correctly, they can serve as a single source of truth for what you want to achieve as a team or organization.
Apple has reportedly acquired API integration developer Stamplay for 5 million euros ($5.678 million).
The Rome-based startup won a contest to make the best use of new Visa APIs, according to Venture Beat. While it’s unknown exactly why Apple is interested in Stamplay, the fact that the company has experience in the financial payments industry could be beneficial to the tech giant with Apple Pay, its digital payment service. In fact, it is expected to expand the service with a self-branded credit card next week.
Stamplay co-founder Giuliano Iacobelli has described the company’s focus as “Lego for APIs,” enabling business developers to easily connect both internal and external APIs to apps.
As part of the acquisition, Apple agreed to keep Stamplay’s founders on at the company, although they will now be Apple employees.
Apple has continued to expand Apple Pay, adding new banks and credit unions throughout 2018. Last year, the service popped up for iPhone users in Brazil, Ireland and Spain. It also launched in Poland in June, working with banks including Alior, BGŻ BNP Paribas, BZ WBK, Getin, mBank, Nest Bank, Pekao and Raiffeisen Polbank, with more expected to be added.
In addition, Apple CEO Tim Cook noted that total transactions tripled on a year-over-year basis.
“We believe the availability of Apple Pay at major transit systems has been a key driver of adoption among commuters, and in March, we launched Express Transit with Apple Pay in Beijing and Shanghai — the second- and third-largest transit systems in the world,” Cook said at the time.
And earlier this year it was reported that the service was looking to make inroads in Australia through its dual-network debit cards where users can opt for Visa or EFTPOS, an electronic payments system that is tied to debit or credit cards presented at the point of sale and available only in Australia.
from PYMNTS.com https://www.pymnts.com/apple/2019/apple-payments-api-developer-stamplay/
Developers are a tough market — we always know we could do it ourself, and better.
Designer tools are a very noisy market with a combination of big dollars spent by incumbents such as Adobe, hot VC-backed startups and a muttering of scrappy incomers.
Bridging those two worlds with a genuinely better offering is very, very ambitious. Supernova is a relatively recent Mac tool which does just that (and they just graduated Y-Combinator’s W19 class).
Approaching the Supernova
I first noticed Supernova on Product Hunt when they were #2 product of the day, back in July 2017. With a long background in such tools (see below), I was fascinated but also sceptical. It’s easy to talk big about generating code but very hard to get right. I was deep in non-UI development and didn’t think I needed the tool but liked what I was hearing.
By early 2018 two things had become obvious — I was going to have to put a lot more effort into UI development of my product, and Supernova was convincingly real. I’d been going from paper prototype straight to XCode but needed to play with high-fidelity prototypes of a lot more screens. For the first time, as an amateur designer, I started throwing together screens in Sketch.
Welcome to Hand-off Hell.
In many teams, there’s an uncomfortable designer-developer loop called Hand off. A bunch of static pictures representing the screen have to be completely re-created using programming languages and other tools. The only thing from from the original, carefully-drawn, images that goes directly into the final product are small icons. The bigger your team and product, the more painful this loop. The result is often developers making fine visual design decisions because there’s not the time to go back to a designer.
If you are really unlucky, as a developer, you just get static images. You don’t even get vector art originals in Sketch, where you can go inside and see what measurements were used. I’ve found myself using tools to work out the colours and relative sizes from a bunch of screenshots saved as JPEG images.
Small teams and solo founders need a lot of leverage. Supernova is to UI development as Cloud computing is to backend.
Even working by yourself, going from Sketch drawings to working code i̵s̵ was a manual process. There have been a few tools doing code generation from Sketch, mostly for web, and one native iOS tool that’s since apparently died on the vine. Nothing really accelerated the process, before Supernova.
Supernova Studio is the best, most usable and technically-credible code generation and prototyping tool I’ve seen in twenty years.
You start by bringing in the static screen layouts from Sketch, which are little more than rectangles with occasional words. Quickly, in Supernova, you mark them as different components, buttons, image views, tables of cells. Some of these components are automatically identified (a photograph is obviously some kind of image view). This semantic analysis is continually improving.
You can add interactions, navigation to other screens and animations (discussed more below). Within Supernova alone, the preview lets you see a reasonable representation of the app experience.
Supernova provides built-in translation, using Google Translate. This means at any time you can preview your screens in different languages.
In particular, because you can preview on different devices sizes, you can see how your prose will wrap differently. This is not just about aesthetics — it’s insulting to a user to cut off the description of a feature just because you only test in English.
Dividing and Unifying with Code Generation
Ask any two developers their opinion on tools that automatically generate code and you will likely get three opinions back.
Smart engineers are lazy engineers and appreciate tools which save time building the same skeletons or boilerplate code. We’re used to at least the basics being created with different project types in XCode, Android Studio and other tools.
Taking that a step further to generating an entire, nearly working screen, is where people’s previous bad experiences start to surface. In theory, going from layout to finished code is a relatively mechanical process. In practice, people have their own ways of doing things. This means, for some teams, Supernova’s code generation will be an unused feature. But, even if you have a good reason to ignore it, having compilable code generated means any measurements and layout logic can at least be examined.
Being able to inspect generated code unifies your design and development teams with harmony rather than frustrated questions. Comparing changes in the generated code is also an easy way for developers to see the evolution of a design.
If you’re unified because your design and development teams are residing in the same brain, then a tool like Supernova is a sanity-saver as well as major time-saver. The smaller the team, the more I recommend sticking closely to their generated code and relax without having to learn as much detail about different platforms.
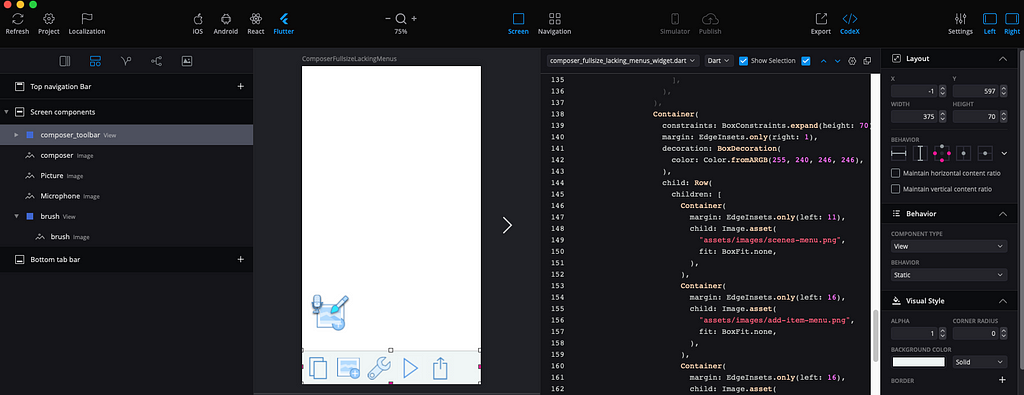
Currently, Supernova generates platform-distinct code for iOS (Swift) and Android (Java or Kotlin) as well as the cross-platform React Native (JavaScript) and new hotness Flutter (Dart). The latter two have been added in the year I’ve been using the tool.
So, as well as being a productivity tool, it becomes an educational one. I can design a trivial user interface with a couple of controls, see the familiar Swift code and iOS resources then compare that to Flutter or Kotlin.
Animation is the new table-stakes in user experience.
Supernova gives you both kinds of animation a modern app needs
The gif below was recorded from the Supernova preview screen and demonstrates two kinds of animation. The project files are available on github, including the original Sketch.
First, there’s the trivial slide-in effect as you change screens. A button on a menu has the Interaction type Navigate to screen.The most basic kind of prototyping experience starts with linking together your screen images with different hotspots
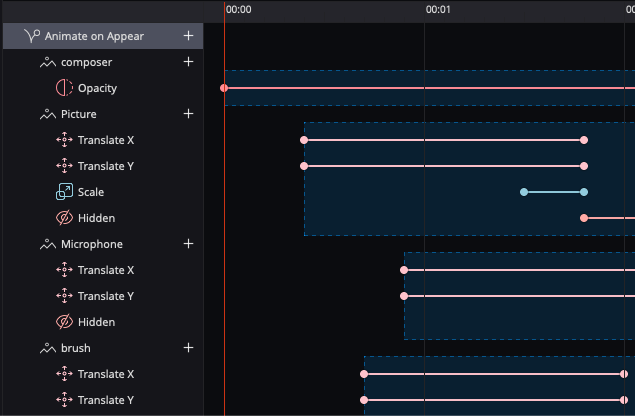
A much more complex animation is built up and triggered on entry to the second screen. I wanted a flight-control kind of illusion of different tools you can use in the Composer to fly into the menu at the bottom. A copy of the icon has three extra shapes overlaid on top of it which move at different rates when the animation starts.
Two screens showing transition with micro-interaction animation
The Supernova team consider the existing animation very much an introductory product. They’ve shared a roadmap showing many features coming, but even these simple property animations were enough for me to design a simple micro-interaction I was happy with.
Timeline editor for the animation
Remember that Supernova is a full code-generating product, not just a prototyping tool. Many of their competitors stop at letting you visually edit an animation, maybe saving a video to show how it works.
Supernova’s Codex provides live, real-time generated code alongside your visual design, letting you flip between languages to see how animation works in each. The Swift code below has a portion highlighted because I selected the Microphone’s Translate Y property animation. It’s comforting and educational, when you have built up a complex animation, to be able to step through the components and see the matching code.
Swift animation code
Why is this guy an authority on tools?
I’ve been an obsessive tool user and maker as a developer for over 35 years. (Let me tell you about the way VAX/VMS let you combine FORTRAN and BASIC subroutines with COBOL…).
In the Classic Mac era, I worked on the two dominant code generation tools. I was contracted to write the Think Class Library code generators for George Cossey’s Marksman (aka Prototyper). Think Class Library (TCL) was a major OO framework, part of the Think C product acquired by Symantec. It was a 2nd generation OO framework, similar to Apple’s MacApp. Greg Dow, the TCL architect, went on to write the dominant C++ framework of the Classic Mac era — Metrowerks’s PowerPlant.
From 1992 to 1999 I worked in close collaboration with Spec Bowers of AppMaker on his code-generation product especially on the PowerPlant generators. I extended his product to integrate my OOFILE database and forms framework. Later, I created a compile-time mapping(PP2MFC) that allowed you to compile PowerPlant frameworks for Windows. I wrote custom code generators for AppMaker to generate Windows apps and we co-marketed these including a booth at Macworld, back when it was the dominant Moscone-filling conference.
My most recent commercial SDK/tooling gig was working at Realm on the Xamarin SDK 2015–2017 (just to let you know I’m not an old dude who’s past it). Oh, I live in the world’s most isolated continental capital city — all the above collaborations have been online from Perth, Western Australia. I reallyunderstand remote work.
Why do we prototype? most of you, dear readers, would agree that design process for any medium, whether physical or digital, cannot exist without prototyping. Prototyping is such an essential part of any design work that we can’t even imagine not having it as part of our workflow.
In fact, it’s so essential, so obvious… that it stopped being discussed as something we suppose to care for and optimize. After all, everyone knows how to prototype, right?
Unfortunately… wrong.
Throughout the last decade, I’ve seen absolutely terrific approaches to prototyping that pushed projects forward in great, initially unforeseen, directions and some truly terrible attempts to prototype, that led projects astray.
To really understand what differentiates bad prototyping from excellent prototyping, we have to explore the reasons for why we prototype in the first place?
In my opinion, there are 3 reasons:
Exploration. To explore variety of design concepts without investing resources into producing the final product
Testing. To test many design concepts with users before any production work starts.
Specification. To show how the product is supposed to work without investing into documentation that describes details of every single feature.
Prototyping cuts costs and increases our understanding of experiences that we’re suppose to build.
So what could go wrong? Apparently plenty.
Changes in the process in the last 10 years
In the past decade, we’ve observed a massive growth in the UX design industry. Teams became bigger, number of available positions went through the roof (in 2017 CBS listed UX as a 9th most attractive job in America!) and design became more valued by executives than ever. Forbes called it the UX Gold rush. According to one of the fathers of modern UX – Jakob Nielsen, we can expect even more growth in the next 25 years.
With all the growth, we also observed changes in the design process. Ten years ago, the process of designing the experience and the process of designing the final graphic design were, more often than not, separated. We used different tools for every part of the process (typically Axure + Photoshop) and quite often – different people. Designers, focused on the prototyping process, would typically work on the interaction between the human and the interface and test and iterate over a low to mid fidelity prototype. The aesthetic part of the work would be a graphic designer’s job.
Over the years, we observed a gradually growing desire to merge these two parts of the process and roles.
One could argue that it makes a lot of sense. As humans we don’t dissect our experiences to separate aesthetics from function, and hence great design needs to embrace both. If a designer is able to efficiently work within the two worlds – why would that unification of positions and processes be bad? Sounds like a great design process.
Unfortunately, more often than not it’s a recipe for disaster.
First of all, it’s really hard to find designers who can efficiently work with both the experience and the aesthetic part of the design process. And while, in my opinion, we should all aspire to build this unification of skills and knowledge in us, it is a process that, industry wide, will take years, if not decades. Patience is a virtue of career growth in a crafty industry like design, but the job market remains as impatient as ever. While universal designers are slowly growing their skills, the demand for them is at its highest. And with that… the design process broke.
Following the demand on the market, designers, who are suppose to work on crafting interactions between human and machine, started to use high–fidelity, vector design tools. Spending more time on crafting all the visual details early on, leaves little to no time for prototyping, So instead of working on the realistic reflection of the experience of users for exploration, testing and specifications, designers started to ship static art boards connected with “hotspots” and links, in a way slideshows, as prototypes. With that:
testing with users became limited,
exploration became rare (sunken cost of graphic design!)
specification for the development – inaccurate.
Hotspot-based slideshows of graphic design mockups are not a fit for any of the reasons to prototype. Yet, they became the dominant process these past few years.
Prototyping and design got sacrificed on the altar of the industry growth.
When hotspot–based prototyping is OK
Alright, let’s catch a breath. The situation is not great, but it’s not all bad neither.
Hotspot-based design slideshows can simulate very basic use cases. Over the years tools started to animate changes between static artboards which can generate a visually attractive animated prototype for couple of simple use cases.
Examples of use cases where hot–spot approach can work well:
simple landing pages
small changes to simple design patterns
quick demos intended only to demonstrate design skills to other designers (Dribbble demos!)
More complicated situations need more a advanced approach to prototyping and more advanced tools. Attempts to fit complex design work into a static, vector design tool with a highly limited prototyping capability ends up as a set of suboptimal user experiences, broken design process (especially on the edge of design and development!) and, at times, completely broken design patterns.
When hotspot–based prototypes break the design process… and the web
How can a simplistic design process, static design tools and hot–spot based prototypes break the web? One could write a book about it.
When a designer focuses on designing the interface with a static, vector design tool (such as Sketch, Figma, XD, Studio…) certain aspects of user experience become simply unavailable. So it happens that many of them are absolutely crucial for the prototyping and testing digital experiences. Limitations of those tools take designers hostage.
Examples? In all these vector design tools:
Users cannot enter any content into a prototype (there are no text fields, checkboxes, radio buttons…)
Content provided by users cannot affect design
Components cannot have interactions that are triggered by user actions or changes in other interactive components
… and many more!
The list can go on and on.Vector design tools limit the ability of designers to emulate the entire, planned user experience. Forget about testing forms and validations or advanced forms of navigation. Vectors tools bring everything to the form of a static image that you can only partially bring to life with hotspots.
And what’s the result? Wrong design decisions, untested prototypes, tension between design and engineering… everything that proper prototyping can solve completely disappeared from the design process. Why? Because of vector design tools and hot–spot prototyping.
Here’s a concrete example that you’ve definitely experienced personally.
You sign up for a web app. You’ve just entered your email address, and now it’s time for password. You’ve entered your choice of a password into an input and you’re ready to submit the information. Just when you expect to move forward, you get an error message: “Password needs more than seven characters, one number and one special character”.
Frustrating, isn’t it?
The security reasons are unquestionable, but why wouldn’t they dynamically check the content of the input and show the validation method before you submitted the information. It’s not technologically challenging, so… why?
Most likely, the form was designed in that way. Because vector design tools don’t allow for state of elements and inputs. So a designer probably put together two static art boards, one with the default state, one with the error state and linked them together with a hotspot. The engineer looked at it and built exactly what she was asked.
And there you have it—the wrong design tool likely led to a horrible user experience. Could that be avoided with written documentation? A conversation? Yes. Most definitely. But when you build a process around a faulty set of tools, you’re increasing the risk of errors.
Processes run by humans break faster than good tools run on… machines.
The future of prototyping is here. And it’s code–based
Let’s get back to the beginning of the post. We want prototyping to empower:
Exploration
Testing
Specification
We know that a combination of a vector design tool and hotspot prototyping is not the answer; it leads to completely broken experiences.. Do we have to come back to the tools we used 10 years ago? No.
Let me show you two prototypes created entirely in UXPin without any coding:
Password with dynamic validation
Credit Card form with credit card type recognition, validation and dynamic confimationion page.You’re probably wondering, “What is this sorcery?”.
Unlike vector design tools that are primarily optimized for work with illustrations and icons (the only real use cases for vectors outputted by all these tools), UXPin, has been built from scratch as an interface design tool. To achieve this goal, UXPin is built in the paradigm of code–based design tooling, which gives designers access to the powers of HTML, CSS and JavaScript, without asking them to actually code anything. You can design forms, plan validation (all elements can have states and you can validate users’ input with simple expressions!) and create chains of conditional interactions. All of that in a highly visual design environment that is ready to cover the entire flow.
Welcome back, real prototyping. Sleep well, hotspot limitations! It’s time to improve the web.
Understanding machine learning using simple code examples.
“Machine Learning, Artificial Intelligence, Deep Learning, Data Science, Neural Networks”
You must’ve surely read somewhere about how these things are gonna take away future jobs, overthrow us as dominant species on earth and how we’d have to find Arnold Schwarzenegger and John Connor to save humanity.
With current hype, there is no surprise you might have.
But, what is Machine Learning and what is Artificial Intelligence?
Machine learning is the scientific study of algorithms and statistical models that computer systems use to effectively perform a specific taskwithout using explicit instructions, relying on patterns and inference instead. It is seen as a subset of artificial intelligence.
And what is Neural Network?
Artificial neural networks or connectionist systems are computing systems inspired by the biological neural networks that constitute animal brains. The neural network itself is not an algorithm, but rather a framework for many different machine learning algorithms to work together and process complex data inputs.
Yes, machine learning is a subset of Artificial Intelligence, and no, AI does not mean Terminators who’ve spread using the internet and have a hub called Skynet.
Traditional forms of programming rely on a specific set of instructions for the computer in a specific language, which a compiler turns to assembly and machine code which the CPU understands and executes.
So, we decide what computer would give us for output. We’re the brain in this process and we tell computers exactly what to do and when to do it.
That’s the general premise of traditional programming.
Machine learning here is bit different. You use data to train your machine learning model to let the machine make decisions based on the outcomes of this training.
Confused? Here’s an example:
How do you understand any new concept as a human? You see the concept, try to figure out what it’s saying, see some examples and understand how to do similar examples using the same concept.
Right?
This is exactly what machine learning is, except here we give the examples to our model which chunks out the output based on previous outputs found in the data.
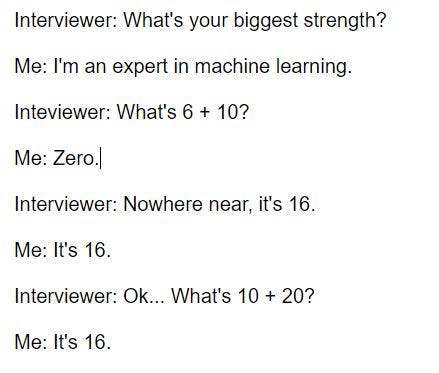
Yes, this joke somewhat coarsely represents how machine learning works.
Now that you simply understand the concept of machine learning, let’s get into some simple code examples.
Here, I’ll be using the machine learning library ‘brain.js’ and JavaScript and Node.js.
For this example we’d be using a simple and very small amount of data.
So we have 4 football teams as input, namely 1, 2, 3, 4. Why are these not interesting names and just numbers?
Well, I am not that innovative, blame my un-originality.
So, if the output is 0, that means first team won and if the output is 1 then that means second team won. E.g. input: [1, 3], output: [1] → Team “3" won.
So, now let’s code this.
// Here we used the brain.js library to get a ready neural network
const brain = require('brain.js');
const network = new brain.NeuralNetwork();
// Now let's train the data
network.train([
     { input: [1, 2], output: [1] }, // team 2 wins
     { input: [1, 3], output: [1] }, // team 3 wins
     { input: [2, 3], output: [0] }, // team 2 wins
     { input: [2, 4], output: [1] }, // team 4 wins
     { input: [1, 2], output: [0] }, // team 1 wins
     { input: [1, 3], output: [0] }, // team 3 wins
     { input: [3, 4], output: [0] }  // team 3 wins
]);
This code trained your neural network on the basis of your data provided. Now you can get probable output for any team’s winning using machine learning.
And yes, you’ve built yourself a machine learning model which has been trained using your data, which can predict which team would win based on that data.
But of course, real world machine learning can’t rely on 7 lines of input data. Lots of data is used to get desirable results with the maximum accuracy possible.
So let’s get into another example with a larger amount of data.
We’d use this data file for our input data. Naming the file as (data.json).
[
     {    "text": "my unit test failed",
          "category": "software"
     },
     {    "text": "tried the program, but it was buggy",
          "category": "software"
     },
     {    "text": "i need a new power supply",
          "category": "hardware"
     },
     {    "text": "the drive has a 2TB capacity",
          "category": "hardware"
     },
     {    "text": "unit-tests",
          "category": "software"
     },
     {    "text": "program",
          "category": "software"
     },
     {    "text": "power supply",
          "category": "hardware"
     },
     {    "text": "drive",
          "category": "hardware"
     },
     {    "text": "it needs more memory",
          "category": "hardware"
     },
     {    "text": "code",
          "category": "software"
     },
     {    "text": "i found some bugs in the code",
          "category": "software"
     },
     {    "text": "i swapped the memory",
          "category": "hardware"
     },
     {    "text": "i tested the code",
          "category": "software"
     }
]
The above JSON data file has some sentences and a category has been allocated to it.
Our machine learning model will take a line as an input and tell the category it belongs to.
So let’s get into some code.
const brain = require('brain.js');
const data = require('./data.json');
This above code uses the library to create a long short term memory (LSTM)neural network which is trained with about data for 2000 iterations.
For better results, we train our model many times with the same data to get more accuracy in results. Think of it like doing the same example question many times, until you get it perfect without making any mistakes.
You can test you network like this:
const output = network.run('I fixed the power suppy');
// Category: hardware
const output = network.run('The code has some bugs');
// Category: software
console.log(`Category: ${output}`);
And yes, you’ve built yourself a more complex machine learning model which computes category based on the statement belongs to.
What are you waiting for?
Go and Show Off your neural networks !!
In case we’re meeting for the first time here, I am Pradyuman Dixit and I mostly write about Machine learning, Android Development and sometimes about Web Development.
You can read my other Machine Learning posts here:
Understanding machine learning using simple code examples.
“Machine Learning, Artificial Intelligence, Deep Learning, Data Science, Neural Networks”
You must’ve surely read somewhere about how these things are gonna take away future jobs, overthrow us as dominant species on earth and how we’d have to find Arnold Schwarzenegger and John Connor to save humanity.
With current hype, there is no surprise you might have.
But, what is Machine Learning and what is Artificial Intelligence?
Machine learning is the scientific study of algorithms and statistical models that computer systems use to effectively perform a specific taskwithout using explicit instructions, relying on patterns and inference instead. It is seen as a subset of artificial intelligence.
And what is Neural Network?
Artificial neural networks or connectionist systems are computing systems inspired by the biological neural networks that constitute animal brains. The neural network itself is not an algorithm, but rather a framework for many different machine learning algorithms to work together and process complex data inputs.
Yes, machine learning is a subset of Artificial Intelligence, and no, AI does not mean Terminators who’ve spread using the internet and have a hub called Skynet.
Traditional forms of programming rely on a specific set of instructions for the computer in a specific language, which a compiler turns to assembly and machine code which the CPU understands and executes.
So, we decide what computer would give us for output. We’re the brain in this process and we tell computers exactly what to do and when to do it.
That’s the general premise of traditional programming.
Machine learning here is bit different. You use data to train your machine learning model to let the machine make decisions based on the outcomes of this training.
Confused? Here’s an example:
How do you understand any new concept as a human? You see the concept, try to figure out what it’s saying, see some examples and understand how to do similar examples using the same concept.
Right?
This is exactly what machine learning is, except here we give the examples to our model which chunks out the output based on previous outputs found in the data.
Yes, this joke somewhat coarsely represents how machine learning works.
Now that you simply understand the concept of machine learning, let’s get into some simple code examples.
Here, I’ll be using the machine learning library ‘brain.js’ and JavaScript and Node.js.
For this example we’d be using a simple and very small amount of data.
So we have 4 football teams as input, namely 1, 2, 3, 4. Why are these not interesting names and just numbers?
Well, I am not that innovative, blame my un-originality.
So, if the output is 0, that means first team won and if the output is 1 then that means second team won. E.g. input: [1, 3], output: [1] → Team “3" won.
So, now let’s code this.
// Here we used the brain.js library to get a ready neural network
const brain = require('brain.js');
const network = new brain.NeuralNetwork();
// Now let's train the data
network.train([
     { input: [1, 2], output: [1] }, // team 2 wins
     { input: [1, 3], output: [1] }, // team 3 wins
     { input: [2, 3], output: [0] }, // team 2 wins
     { input: [2, 4], output: [1] }, // team 4 wins
     { input: [1, 2], output: [0] }, // team 1 wins
     { input: [1, 3], output: [0] }, // team 3 wins
     { input: [3, 4], output: [0] }  // team 3 wins
]);
This code trained your neural network on the basis of your data provided. Now you can get probable output for any team’s winning using machine learning.
And yes, you’ve built yourself a machine learning model which has been trained using your data, which can predict which team would win based on that data.
But of course, real world machine learning can’t rely on 7 lines of input data. Lots of data is used to get desirable results with the maximum accuracy possible.
So let’s get into another example with a larger amount of data.
We’d use this data file for our input data. Naming the file as (data.json).
[
     {    "text": "my unit test failed",
          "category": "software"
     },
     {    "text": "tried the program, but it was buggy",
          "category": "software"
     },
     {    "text": "i need a new power supply",
          "category": "hardware"
     },
     {    "text": "the drive has a 2TB capacity",
          "category": "hardware"
     },
     {    "text": "unit-tests",
          "category": "software"
     },
     {    "text": "program",
          "category": "software"
     },
     {    "text": "power supply",
          "category": "hardware"
     },
     {    "text": "drive",
          "category": "hardware"
     },
     {    "text": "it needs more memory",
          "category": "hardware"
     },
     {    "text": "code",
          "category": "software"
     },
     {    "text": "i found some bugs in the code",
          "category": "software"
     },
     {    "text": "i swapped the memory",
          "category": "hardware"
     },
     {    "text": "i tested the code",
          "category": "software"
     }
]
The above JSON data file has some sentences and a category has been allocated to it.
Our machine learning model will take a line as an input and tell the category it belongs to.
So let’s get into some code.
const brain = require('brain.js');
const data = require('./data.json');
This above code uses the library to create a long short term memory (LSTM)neural network which is trained with about data for 2000 iterations.
For better results, we train our model many times with the same data to get more accuracy in results. Think of it like doing the same example question many times, until you get it perfect without making any mistakes.
You can test you network like this:
const output = network.run('I fixed the power suppy');
// Category: hardware
const output = network.run('The code has some bugs');
// Category: software
console.log(`Category: ${output}`);
And yes, you’ve built yourself a more complex machine learning model which computes category based on the statement belongs to.
What are you waiting for?
Go and Show Off your neural networks !!
In case we’re meeting for the first time here, I am Pradyuman Dixit and I mostly write about Machine learning, Android Development and sometimes about Web Development.
You can read my other Machine Learning posts here: