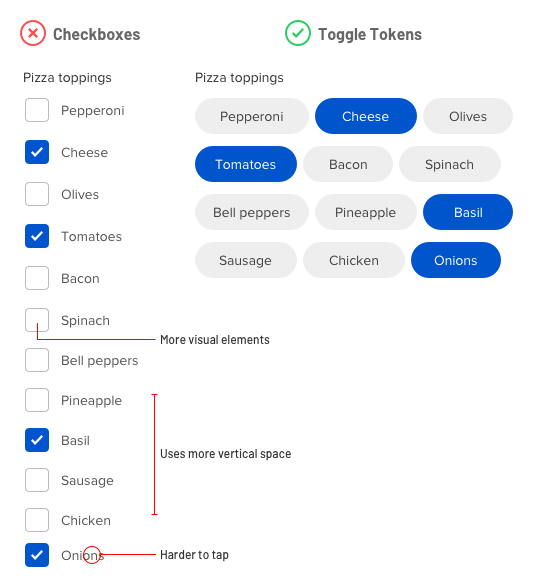
What interface component would you use for selecting from a large set of options? For most designers, checkboxes come to mind. But a long list of checkboxes is intimidating to users and can cause them to abandon your form. Not only that, but checkboxes are not efficient or easy to use because they take up space, increase the number of visual elements, and offer small tap targets.
A better component for option selection is toggle tokens. Toggle tokens conserve vertical space so you have room for more content and users don’t have to scroll. Checkboxes require vertical stacking, but toggle tokens allow for both vertical and horizontal stacking. This creates a compact arrangement that makes it less intimidating for users.
Not only that, but toggle tokens don’t require a checkbox and checkmark with the label. As a result, there are fewer elements on the screen competing for the user’s attention. Minimizing visual noise allows users to focus on the options.
The small tap targets of checkboxes can also cause tapping issues. Toggle tokens offer larger tap targets so users can make selections without mistapping.
All these benefits make toggle tokens a better component for selecting options than checkboxes. However, there is an exception when checkboxes fare better.
If your options have long text labels that wrap to multiple lines, you should use checkboxes. Checkbox labels aren’t horizontally constrained and allow enough space for more text. On the other hand, toggle tokens are constrained by its background shape and should only be used when your options are single text line labels.
The name “toggle token” is also as intuitive as the name “checkbox.” It comes from its token-like shape and toggle functionality. Next time you’re thinking about using checkboxes for option selection, consider toggle tokens instead. You’ll conserve screen space and simplify the interface, which will prevent users from abandoning your form.
from UX Movement https://uxmovement.com/forms/why-toggle-tokens-are-a-better-alternative-to-checkboxes/
I love this question. Because not too long ago, the question was: “Isn’t programming for engineers?”. This implies that we’ve since established that it isn’t. You don’t have to be an engineer to code. And you need “enough code to be dangerous” to greatly increase your potential for complex creative expression.
When designers talk about code, it’s most often in the context of designing interfaces. And the way we think of interface composition is in elements, like buttons, lists, navigation, etc. React is an optimized way to express interfaces in these elements, through components. It helps you build complex interfaces (and even simple interfaces get complex quickly) in an efficient way. By organizing your interfaces into three key concepts— components, props, and state—you can express anything you can think of and get all these things easily:
Clear structure and rules to help organize your code, so you don’t have to start over at a certain complexity.
A way to isolate, compose, and re-use parts of your code between projects and across teams in the form of simple components or even complex design systems.
Good rules to collaborate with others, as everything is built in a similar way.
React is a smart way to organize old interface code using simple concepts and rules. Saying that it‘s only useful for engineers would be like saying that no amateur photographer should ever buy a Leica. If you have the opportunity, why not work with the best tools?
Why does React seem so hard?
I’ve noticed that designers with experience building interfaces in jQuery, ActionScript, or (ironically) Framer Classic tend to struggle with React.
This has little to do with React and everything do to with programming models. The examples mentioned above use an imperative model, while React uses a declarative model. Let me explain the difference…
Imperative model
Much like giving someone step-by-step directions to cook a dish, an imperative model requires you to describe the exact steps to achieve a change.
Declarative model
A declarative model describes changes as before and after and lets the computer figure out the steps in between…much like ordering your custom frappuccino.
As designers, we’re used to working declaratively. Every timeline application where you tween between two states is a fantastic example. You describe before and after, and the computer figures out the tween.
Let’s try to look at this from a programmer’s perspective and build a simple login flow. This is not real or complete code, it just tries to illustrate the difference in approach.
The imperative app uses (fake) jQuery to describe exactly what to change if something happens. This should look familiar if you’ve used it a lot.
$("button .login").onClick(()=>{
$("form").attr("enabled",false)
$("body").append($("div.spinner"))
doLogin((success, username)=>{
if(success){
$("form").remove()
$("div.spinner").remove()
$("body").append($(`Welcome back ${username}`))
}else{
$("form").attr("enabled",true)
$("form.error").text("Could not login")
$("div.spinner").remove()
}
})
})
COPY
The declarative (fake) React code describes the three different states of the app: logged_out, logging_in and logged_in. It seems to completely re-render your app at every change, but the trick is that under the hood it figures out all the differences and only updates those so that everything stays as fast as possible.
functionApp({ state ="logged_out", username =null}){
if(!state ==="logged_out"){
return<Login/>
}
if(!state ==="logging_in"){
return<Spinner/>
}
if(!state ==="logged_in"){
return<div>Welcome back {username}</div>
}
}
COPY
I hope these examples have illustrated why the declarative model makes a lot of sense for building interfaces. It does require a bit of a mind-shift if you have gotten used to the imperative model, but it’s ultimately worth it.
What is application state?
Now state can refer to many things. Animators see it as a visual configuration at a specific moment in time, explicitly defined. Web designers think of it as events that trigger a CSS class like hover, press, or loading.
But React was defined by engineers and they think of state as the current internal state of your application, which is defined as what you see on the screen. So in other words, state is all the variables that make up your application. Let’s look at some visual examples.
Let’s assume this card is my entire app for now. To draw it with real data I need 7 variables in total: profile_image_url, name, handle, tweets_count, tweets_imagesfollowing_count and followers_count.
So if I were to describe the state in JavaScript it would look something like this:
You see that these variables let me make every possible combination for this card. Much like a cold email template with variables Hello #{first_name} let’s meet for coffee.
But a full application state has way more things; from dynamic views to login fields. So let’s zoom out a little and look at an entire application state for a Twitter app.
Suddenly, there’s a lot more going on. Navigation tabs, logins, feed with loading, search etc. But nothing really changes in our approach. The state just becomes more extensive. Let’s look at what we would need to add to the above to describe the full Twitter interface state:
{
logged_in:true,
selected_tab:"feed",
search_query:null,
tweet:null,
feed_loading:false,
feed:[
{ id:123, name:"Ryan Florence", tweet:"React gave me..."...},
You can see how these are all the variables that we need to show the application, neatly stored together. If we were to now write some interface code, it would look something like this (for simplicity’s sake, I’ve left some things out):
This is obviously an extremely simplified version, but if you have built prototypes before this should look really familiar. We really cleanly separated state and interface logic.
And now comes the magic moment (I hope). For me, this is the point where React really started to click. Look at the code again and notice how… simple it all is. Think about when you were building something similar in jQuery or Flash. You were likely writing a ton of:
$("#feed").click(function(){
$("#feed").attr("enabled",true)
$("#notifications").attr("enabled",false)
$("#messages").attr("enabled",false)
})
COPY
They all change the page a bit and update the state. But where is the state? It’s embedded in the page, and built up over time through all the functions that cause it to change. So when you eventually run into an unexpected state (and you will) it’s really hard to easily get an overview of the state, let alone reason or reproduce it so you can debug.
React always forces you to cleanly separate state and update it at once. That way you can write extremely simple code and avoid many bugs. It’s an extremely pleasant way to work. And it’s the main reason React (and other declarative component frameworks) are dominating.
To fully close the loop, let’s see how engineers look at (and talk about) this. This part isn’t needed to get work done, but it does seems like a pity to get this far and not also try to explain some of the very-accurate-but-deliberately-hard-sounding engineering terminology. Don’t worry if you don’t get this part (or don’t care).
So if you just take the Tweet function and completely empty it out you get:
functionTweet(state){return output }
COPY
Or even more simplified in a mathematical notation:
Your application is a function of your state. Every time you insert the same state, you get the exact same output. You always render your entire app as a whole, so it’s extremely easy to reason about and React makes sure it’s still fast through only actually updating the changes.
If you want to go deeper on this concept I recommend Pure UI by Guillermo Rauch .
What are props and state?
This is likely the most often asked React question because it confuses so many people. But it’s honestly very simple, especially if you know some HTML. Before getting into the theory, let me show you using code. I’ll start with props because you almost always need props, but you definitely don’t always need state.
<imgsrc="test.jpg"width="100px"height="100px"/>
COPY
This element has three props: src, width and height. In HTML you would call them attributes. Programmers often call these properties; React just shortened it to props. That’s all there is to it.
Let’s say you would write your own special square image element in React, you get these passed in so you can use them:
functionSquareImage({ src, size }){
return<imgsrc={src}width={size}height={size}/>
}
<SquareImagesrc="test.jpg"size="100px"/>
COPY
So props are just the attributes of your components. You use them to configure your components and it’s how components get values passed in from the outside. This last part is the key difference with state.
Because sometimes your component only needs values within the component itself. That sounds weird but think, for example, about a hover state that changes text. The component itself responds to the hover state, and changes its own text.
No outside values required, so we’re not using props, just state. It just needs a text value and that is only changed by the component itself. You can obviously mix props and state as needed.
Hooks and State
Hooks are a hip name for things you can do in a component. The most common one that you will run into is useState. It allows the component to remember some value, and update when it changes. The syntax may look a bit scary at first, but it’s really not that hard.
const[scale, setScale]= React.useState(1)
COPY
What this does is it sets the scale variable to the value 1. Much like:
So why all that other stuff? Well, when you change this scale in the future, you want to ensure the component changes with it, so it needs to update itself on the screen. In short, for React to know the value is updated, it needs a hook.
This is where the React.useState(1) comes in. It lets React know:
Hey React! You want to keep an eye on this value here.
Oh by the way the default value for it is 1.
React: no problem! I’ll keep track of it. Here you have two things back:
The current value for scale (which is 1 if you never changed it).
A function to update the value so that I know about it too, called setScale.
So the complicated looking const [scale, setScale] is just needed because React gives you back two things instead of one, and this little shortcut is a nice way to give them both names. You could actually write the exact same code without the shortcut like this:
const hook = React.useState(1)
const scale = hook[0]
const setScale = hook[1]
COPY
Whew, ok. I hope just enough info for you to now just use the shortcut. The last thing we need to look at is how to change the scale value with setScale. Let’s do that with a full example:
Pretty easy; if you tap the scale gets set to 2 using setScale and React updates the component. To finish off, I’ll show you almost the same but now a little bit more explicit using the function notation I used before. This is mostly a preference, you can pick what you like better. Additionally, this example will increase the scale by 0.1 every time you tap.
functionMyComponent(){
const[scale, setScale]= React.useState(1)
functiononTap(){
setScale(scale *1.1)
}
return<Framescale={scale}onTap={onTap}/>
}
COPY
A little more code, but a little simpler looking maybe. Again, up to you. But I like this. Here is a pretty great intro if you like to learn more about hooks and build something real.
Class or function components?
There are two ways to define components in React: functions and classes. Until the recent React Hooks release, class-based functions gave you more features for your components. But thanks to React Hooks they can now both do everything, so most people stopped using class-based components.
classKoenComponentextendsReact.Component{
render(){
return<div>Hello world!</div>
}
}
functionKoenComponent(){
return<div>Hello world!</div>
}
COPY
We built the new Framer library on React Hooks because it it simpler and ensures that beginners won’t have to learn about classes, this, etc right off the bat. It’s quite elegant really.
TLDR; use functions and learn about Hooks if you plan to get more advanced with React.
What are overrides again?
In Framer X, when you’d like to add code to canvas elements (defined as anything you draw that isn’t code), you have to use overrides. You can find overrides in the properties panel under code. Just select any object and attach the override you want. You can edit the overrides by clicking Edit Code where you’ll find that we’ve included a bunch of examples by default.
Overrides essentially allow you to modify the props before they get set in the preview. So if you have a frame of the canvas with background: white and an override like so:
import{ Override }from"framer"
exportfunctionChangeBackground(): Override {
return{
background:"yellow",
}
}
COPY
…then the input from the properties starts off as a white color, but changes to yellow as the override gets applied.
Feeling confident about that? Let me show you what overrides look like in code (don’t worry if you don’t get this, it’s just helpful to understand).
functionCanvas(props){
Object.assign(props,ChangeBackground(props))
return<Frame{...props}/>
}
COPY
Dynamic Overrides
Good news—overrides can also be dynamic. This means they get the properties that you set from the canvas are passed on, so you can use them as an input and modify them. Here’s an example that always moves a frame 50px down from its original position:
import{ Override }from"framer"
exportfunctionChangeTop(props): Override {
return{
top: props.top +50,
}
}
COPY
Events
You’ll most likely want to use overrides for interactive work so let me quickly walk you through some cool examples. These use animation functions from our API: whileHover and animate.
import{ Override }from"framer"
exportfunctionHover(props): Override {
return{
whileHover:{ scale:1.2},
}
}
exportfunctionRotateClick(props): Override {
const[rotate, setRotate]= React.useState(0)
return{
onTap(){setRotate(rotate +90)},
animate:{ rotate },
}
}
COPY
Between components
In order for components to communicate in a way that one animates when you click another, you’ll need a way to share data between components (also see state). Framer provides you with a simple Data object that does just that. It holds your data and tells your components to update when you change it.
Let’s create a very simple project that rotates a rounded square when you click on a yellow button. They will both need an override and we’ll call those Button and Rotate.
import*as React from"react"
import{ Override, Data }from"framer"
const data =Data({ rotate:0})
exportfunctionButton(props): Override {
return{
onTap(){
data.rotate +=90
},
}
}
exportfunctionRotate(props): Override {
return{
animate:{ rotate: data.rotate },
}
}
COPY
As you can see, they both use the data object. The Buttonoverride modifies it on a tap, and that causes the Rotateoverride to animate to its new value.
from www.framer.com https://www.framer.com/books/framer-guide-to-react/
Tony the Frosted Flakes tiger sacrificed as a living room rug, wooden dolls handing their babies off to smugglers in freight truck trailers, and welcome mats stitched from life jackets: rather than offering an aspirational lifestyle, one South London storefront window depicts a capitalist dystopia. Created by Banksy and appearing overnight, Gross Domestic Product is the latest installation to critique global society’s major issues of forced human migration, animal exploitation, and the surveillance state.
The temporary installation, which will be on view for two weeks in the Croydon neighborhood, incorporates multiple window displays for a shop that is not in fact open to passersby. However, some of the items on display are available for purchase in GDP’s associated online store including the welcome mats, which Banksy hired refugees in Greek detainment camps to stitch; all proceeds go back to the refugees. Revenue from sales of the doll sets will also support the purchase of a replacement boat for activist Pia Klemp, whose boat was confiscated by the Italian government. The product line is rounded out with such oddities as disco balls made from riot gear helmets, handbags made of bricks, and signed—and partially used—£10 spray paint cans.
Tying this latest project to his larger body of work, Banksy incorporated familiar motifs. The fireplace and stenciled jacquard wallpaper from his Walled Off Hotel, the stab-proof Union Jack vest he created for Stormzy to wear at the Glastonbury Festival, and the Basquiat-inspired ferris wheel that appeared outside the Barbican all appear in GDP.
In a statement about the project, Banksy explains that the impetus behind Gross Domestic Product is a legal battle between the artist and a greeting card company that is contesting the trademark Banksy holds to his art. Lawyer Mark Stephens, who is advising the artist, explains, “Banksy is in a difficult position because he doesn’t produce his own range of shoddy merchandise and the law is quite clear—if the trademark holder is not using the mark then it can be transferred to someone who will.”
Despite this project’s specific goal of selling work in order to allow Banksy to demonstrate the active use of his trademark, the artist clarifies, “I still encourage anyone to copy, borrow, steal and amend my art for amusement, academic research or activism. I just don’t want them to get sole custody of my name.”
Per usual, Banksy shares updates on Instagram, where he claims recent projects, including GDP, which he just announced an hour ago as of press time.