What AI Art can tell us about the future of Design
Creative generated with Dalle 2 with the following prompt “A cyberpunk Designer looking at multiple screens with a robotic arm with neon lights in a dark, smoky room”
I recently spent some time exploring this wonderful new world of possibilities that are offered by what is generally called AI Art. This article could actually cover the potential of this Tech itself. But this topic is already well covered, and I am a Designer, after all, so I also questioned what this could mean for the Design paradigm.
AI Art?
Art is always ahead of things. It feeds creative fields as a raw, endless source of inspiration for anyone. Once again, the Art field leads the way, with or without everyone’s consent, through a new way to create artwork based on simple prompts.
If you read more about this topic, you’ll see many articles mentioning the limitations and risks. You’ll read that the Art world is either embracing it or rejecting it completely. You’ll also read that as the visual expression is made accessible to literally anyone, abuse and mal use will be some of the challenges to solve. But let’s leave these concerns for later, and focus on the world of opportunities this opens for Designers.
A prompt to generate Artwork
But first, let’s have a look at what it can do today. MidJourney is one of the major Research labs that provide a creative generator through Discord or via their own WebApp.
When landing on Discord as a newbie, you are redirected to one of the free trial channels that let you test the service for free. What you have to do it to type “/Imagine” followed by whatever you want to see translated into an image. The more details you give, the better, sharper results you’ll get.
Discovered land, full of machines, animals, plants with the look of Jean Jullien’s artworks
will lead to creating this image in seconds:
Now, if you don’t know who is Jean Jullien, he is a French illustrator who does this kind of work:
Book cover from Jean Jullien
Considering the unrealistic prompt I entered, the AI did a fairly good job of translating my intention into an image! The AI offers 4 variations for 1 prompt, and from then, you can create variations of any of these 4 variations, and so on. You can also start from an image and request to change or use it in any possible way.
The prompt becomes your tool to draw Art. Your capacity to phrase an idea so that the AI can interpret it visually. The rest is all about variations and refinements!
MidJourney, Dall-E 2, the AI Art segment is developing fast!
There are 2 major players in this area, both will let you play around for free for some time. Then both will offer ways to continue at a cost. Both platforms are using different monetization solutions, but we can consider them fairly affordable for what it does. Considering that both are in beta, now is probably a good time to play around!
Seeing the emulsion this creates on the Web, we can guess that other companies will try to develop the AI segment into more various use cases.
The way it works
The way these AI work is truly captivating. Most systems are made of two components, the generator, and the discriminator.
Based on a given prompt, the generator will do its best to generate an accurate and original representation.
The discriminator will challenge the outcome over iterations.
The VQGAN + CLIP model
Among the AI Art models, the most popular one that gained fame in 2022 is the VQGAN + CLIP model.
VQGAN stands for “Vector Quantized Generative Adversarial Network”.
CLIP stands for “Contrastive Image-Language Pretraining”.
Long story short, the VQGAN model generates images, and the CLIP model judges how well the generated images match the text prompt.
For more details about these models and how they interact, you might be interested in reading these articles:
How this same logic can be applied to Design systems
Obviously, these models would need some serious adjustments, but the logic would remain fairly the same. Let’s deep-dive into the wonderful world of assumptions.
We know that the current model uses a neural network that connects existing images from a large database and reads through their Alt Text (their textual descriptions).
So as long as we can create a UI library that is properly documented, with descriptions on every level of clean, atomic component architecture, the same logic could be applied, and an AI could be trained over such a database.
We also know that most AI Art generators are now interfaced with prompts, we just need to write down what we want to create and the AI produces it through the model described above.
So we can assume that we could interface UI work the same way, simply telling what we want to mockup. Dalle-2 also adds details over parts of an image, making the process more refined. We could use the same technic to alter a part of the UI we want to refine.
This AI would work inside an existing UI tool, where all of your settings would remain unchanged (styles, nudge amount, etc.). Technically, the AI could be fed from the Community resources or focused on the shared libraries you are using,.. or a mix of the two.
Considerations
Considering how fast a mockup can be built nowadays, it could be interesting to measure the lead time between a Designer creating a mockup by manipulating the tool and by typing a prompt. My guess is that once we get used to typing prompts (or speaking), the lead time would be much faster than any UI superstar.
But this also brings us one more potential development, that could eventually lead to even more gain of time. So far it seems doable to consider AI as a UI builder. But if the machine could also build up the entire UX flow, then this could mean drastic improvements in terms of efficiency.
Closing Challenge: AI-generated UX, Flows
The model would need some serious adjustments to create interconnections between screens and create an entire UX flow. But if the AI could be able to crawl a large database of UX flows, we can imagine that even the quality of the outcome could become as good or better than what an experienced Designer could do.
Our current tools, Design outcomes are not systematically connecting screens between them. We would need to find the database to train the AI into recognizing UX patterns, but for this, we would first need to… create this database.
More and more Figma integrates Prototyping features inside components and recently made these prototyping interactions pervasive, so we can guess that sooner or later, Designers will be able to systemize interaction patterns. We can also guess that such an initiative should probably come from a tool like Figma (or Adobe?? 😬) or through their Plugin API and open community database.
All this seems a little far from now, right? But if you told me a year ago that I could create Artwork this easily, I wouldn’t have believed it! So maybe the future of Design using AI generators isn’t so far from now after all…
If that triggered your curiosity, here are related resources:
from Design Systems on Medium https://uxdesign.cc/what-ai-art-can-tell-us-about-the-future-of-design-e62e9b4a1920
AR is bringing art to life worldwide. This revolutionary format is changing how people experience and create artwork in their homes, museums, and in educational settings. Here is a look at what augmented art is, and the ways it’s materializing today.
What Is Augmented Art?
Augmented art is artwork that blends the digital and real world. There are numerous ways people can augment art, from fully-digital painting to digital augmentations that enliven real-world artwork.
Backing up, there are two main types of AR — marker-based and markerless. All augmented art generally falls into one of these categories. Marker-based augmented art is attached to some physical object, such as a QR code. Markerless augmented art is more of a freely-moveable digital piece that an artist can place on any real-world flat surface.
Augmented art today usually makes use of the popularity of smartphones by displaying AR pieces through mobile apps or websites. The user’s camera scans any physical objects — such as a QR code marker — and records the real-world setting while the phone’s screen displays the digital objects in that real-world setting.
Augmented art is swiftly changing the art world, as well as museums and educational experiences. Here’s a look at a few of today’s most compelling examples of augmented art.
1. AR-Animated Artwork
AR-animated artwork uses AR to add new layers to physical objects. For example, a user could go into an art gallery and see an abstract painting that looks like a depiction of a pinball machine. If the user scanned the QR code at the bottom of the image, they could go to a website on their phone and actually play the pinball game in the painting in AR.
Augmented art can also animate physical, static objects or pictures through AR. While this is not necessarily interactive, it can add new layers of meaning and depth to the piece or give viewers a better understanding of what the art is depicting.
2. Expanded Museum Experiences
Augmented art can also include AR features that expand museum experiences for guests, adding additional digital content to complement real-world pieces. For example, users could scan QR codes in a contemporary art gallery to see a video interview with the artists or footage of how said artist created the pieces. Many museums around the world are already testing out unique ways of using AR to enhance guest experiences.
For 3D objects, AR could allow viewers to handle and rotate objects to see them from different angles or zoom in on specific features. Museums can even use augmented art to add fun digital experiences for guests, such as an AR photo booth that allows people to turn their selfies into Renaissance portraits.
Augmented art also opens up new educational opportunities for arts and STEM courses. In fact, AR-based art can actually be an excellent tool for bridging the gap between these two sides of education. It seamlessly blends the arts with technology, which can be particularly appealing for younger generations who are digital natives.
For example, a teacher could use augmented art to make math more fun for students who struggle with math courses. The novelty of AR art can turn otherwise tedious or confusing math problems into interactive games that leap off students’ homework pages. They can physically interact with the augmented artwork, potentially sparking renewed interest in complex subjects.
4. AR-Physical Artwork
Augmented art can also appear as artwork that lives in both the real and digital worlds. AR-physical hybrid artwork has a physical component as well as a digital component. AR merges the two together, forming the complete picture.
For example, guests might find a physical canvas in a gallery with a background painted on it. Then, they use AR to see the portrait over that background — a digital face that can blink, smile and come to life. This is a fascinating kind of augmented art that hints at the digital future of the art world, including the rise of digital-first artwork.
NFTs — or non-fungible tokens — have transformed the art world over the past few years. These digital-first art pieces are unique digital designs labeled with a special tag that marks them as the original, so a screenshot or replica could be proven fake. NFTs are created from the start for the digital world, but AR can also bring them into the real world.
As the metaverse develops for entertainment and work, more and more people are investing in digital objects, like avatar clothing or artwork for decorating virtual spaces. Augmented art allows people to merge their virtual and physical worlds. Over the years, people could increasingly use AR to display their valuable NFTs in their real-world homes or galleries.
The Future of Art
ARis revolutionizing art, museums, education and entertainment. It allows people to bring artwork and objects to life and interact with them in new ways. These examples of augmented art are already out there in the world today. In the future, augmented art could become the new normal for the art world, blending the digital and physical realms.
April Miller is a senior writer at ReHack Magazine and editorial contributor at AR Insider. She specializes in VR/AR, IoT, and business technology. See her work here and follow her @rehackmagazine.
More from AR Insider…
from AR Insider https://arinsider.co/2022/10/19/5-ways-ar-is-redefining-art/
This is the story of how I got offers from Google, Amazon, Uber and more without a college degree.
This was me in 2015 ☠️. A startup I had joined as “founding employee” after we raised a $700k seed round from a prototype was shut down six months later and we were looking for new roles. I secured an interview with Codecademy through a referral from one of the startup founders (also GIPHY but I wasn’t interested for some reason. Since then they sold to Facebook 🤦)
On the phone with Codecademy they said “don’t worry we don’t ask crazy algorithms questions or anything like that”. I took that to mean I didn’t need to study algorithms at all 🤣.
During the on-site interview, I got two rounds of algorithms questions that were extremely basic in hindsight. I remember one of them was asking how to traverse from point A to point B in a grid. I had no clue how to do that so I was just doing random shit. I landed on an infinite while loop… I actually wrote on the board:
“ while (true) {…”
In the loop, the point changed direction on each iteration depending on if it hit a wall and would eventually manually break the while loop if the target was found. The interviewer must’ve been like WTFFF, but he kept his cool and kept entertaining my different ideas.
That fiasco opened my eyes to the types of questions I needed to be able to answer. Two and a half months later I passed phone screens at Google, Uber, Shutterstock and Rent the Runway. I did the on-site interviews for Shutterstock, Rent the runway, and Uber and passed all of them. Google rescheduled my interview to be two weeks later than what I told them in the last minute. By that time I already had three offers and was pretty excited about Uber so I pulled the trigger and joined Uber.
I went from 0 → 100 in just a few months and I didn’t do anything special aside from studying consistently. That’s why I strongly believe any engineer can get good at these DS & Algo questions and get into F.A.A.N.G. or similar high paying roles.
At first, I felt I wasn’t really qualified because I had to study so hard to pass my interviews. In 2019, after having run my own consulting firm and startup for almost 2 years, I decided to go back into full-time work and found myself in the same position as I was in 2015.
This time, I had a larger network of friends at Uber and other top companies like Google and Facebook that gave me insight into the real deal. They all had to study just as hard. Even the ones that didn’t drop out of college like I did.
The ones who stayed and completed their Algorithms’ courses and had gotten their Computer Science degrees, they all still needed to study hard.
I discarded this notion of the mythical engineer who can on a whim pass a tech interview and started to appreciate the reality of the situation, that tech interviews are like the SAT’s they give in school. It doesn’t matter that you spent four years learning all of the content in high school, you still need to prep if you want to ace the test. Just like with the SATs all of your past work and grades don’t contribute to the score. Your success depends entirely on how well you perform on the test.
Once I realized the truth, that everybody needs to study, it was enough motivation for me to put in the hard work since I realized that’s what my competition was doing. Through that motivation, I formed a process for studying that helped me pass every tech screen and on-site interview I did in 2019. I, a college dropout, passed technical screens for Stripe, Coinbase and Triplebyte. I passed screens and on-site interviews for Google, Amazon, Uber (again), Reddit, Squarespace and Braze. A 100% pass rate wasn’t expected and isn’t likely to continue to happen, but I believe focusing on the fundamentals helps approach that goal.
Google sends you swag when you pass the interview and match with a team
It wasn’t a smooth transition. When I first started preparing for interviews, it took me over 2 hours to ALMOST solve what would now be called a “leetcode easy” and at the time it felt impossible! I truly believed that I just wasn’t naturally smart enough and would have to study even harder to get to the same level where I could solve the problem at the same speed as a Google engineer.
I got one thing right, you do need to practice.
What I didn’t realize is that this level of difficulty and frustration in the beginning is to be expected by everyone just starting out, including those Google engineers.
I’m still the same person. The only difference between now and then was practice, practice, practice.
A common question people have is “how do I study”? It’s hard to know where to start, what to do next, if you’re making progress and even harder to stay on track. To solve a lot of these issues when I was studying, I created a Trello board with all the topics I wanted to cover. The board helped me focus on the most important topics I should be studying and manage my time to keep progress consistent.
I made a post about the Trello board on LinkedIn and it went viral. A Trello PM contacted me about creating an official Trello template for it which can be found here: Interview Study Tracker.
The tracker provides a template for how to study. It requires identifying a list of topics and searching for two or more resources that can teach you about the topic. Then assigning yourself 2–3 practice questions to solidify your understanding. It can be from any source, the most important thing is the content itself. I found most of my content with simple google searches using the topics as the keyword.
Learning the same thing from different perspectives helps you understand it better. For example, I would read an article on geeksforgeeks.org about binary search trees and also read chapters in Cracking the Coding Interview about them. Then I would do 2–3 practice questions or enough to feel comfortable before moving on.
My copy of “Cracking The Coding Interview 6th Edition” signed by Gayle Laakmann McDowell
Below is a list of nearly all of the data-structures and algorithms that you can come across during a tech interview along with a very brief description and some resources to get started building your study plan. The goal is to provide a starting point for you to build your plan and not to explain in detail what each topic is. Part of your plan is finding resources to learn more about each topic from different perspectives.
If you haven’t heard of some data-structures in the list or haven’t learned much about them before, they might seem complex but as you progress, you’ll soon experience the same feelings you had before and after you understood Arrays.
Think about how complex the concept of an Array is to a non-programmer and how basic it is to even the most junior developers.
These data-structures are just the basic building blocks that help you create algorithms… they actually make things simpler once you take the time to understand them. Just as an Array handles a lot of the work required to maintain an ordered list of elements, these data-structures have functions and containers for efficiently working with data.
These are considered basic. Everyone should know how they work, when to use them, how to implement them and the reasoning behind their tradeoffs:
Array
Set
Hashmap
Linked List
Stack
Queue
Tree
Graph
If this list seems long, don’t worry. A lot of these data-structures are closely related and even build upon each other so you’ll be able to learn them all quicker than you might think.
Hashmaps build upon Arrays. Stacks build upon LinkedLists or Arrays. Queues build upon LinkedLists. Trees share concepts of “nodes” and “links” from LinkedList. Graphs also share the same concepts. They also have a lot of similarities to trees. All trees are technically graphs too so you can apply a lot of the same techniques to them.
After mastering the basic data-structures, knowing these more advanced ones will give you a higher chance of success. Some come up very often during interviews like Heaps and Binary Search Trees. LRU Caches and Tries come up less frequently but are becoming more common. Disjoint Sets and Skip Lists rarely come up, but even if not explicitly asked about them, they can be powerful tools to help you come up with quick and performant solutions.
Heap (a.k.a Priority Queue)
LRU Cache
Binary Search Tree (AVL, Redblack)
Disjoint Set
Trie
Skip List
As we go into more advanced data-structures you’ll see they are usually made using the basic ones as building blocks. Getting a good understanding of the basic data-structures will make learning these advanced ones much easier. You’ll think of them in terms of the smaller structures you already know rather than big new complicated structures.
Heaps, also known as Priority Queues are a type of tree that behave like a queue. Binary Search Trees (BSTs) are another type of tree that make it faster to search for nodes. AVL and Redblack are two popular specific types of balanced BSTs. An LRU Cache is a memory efficient cache built by combining a Hashmap with a LinkedList.
A Trie is another type of tree that makes prefix/substring searches fast. Disjoint Sets are a special type of set that separate its members into non-overlapping subsets, useful for the Union Find algorithm. A Skip List is an optimized version of a LinkedList that reduces the time it takes to find certain nodes.
All data structures are meant to hold information. Some structures need specials ways to access this information efficiently that are more involved than simply accessing an array index or hashmap key. Data-structures that hold collections of data such as Trees and Graphs use a few basic algorithms to access the information within.
Breadth First Search (BFS)
Depth First Search (DFS)
Binary Search
There is a ton of research in this field, but for the purposes of a tech interview, the most advanced searching algorithms you’ll likely come across in order of frequency are:
Quick Select
Dijkstra
Bellman-Ford
A-star (rare)
Sorting is a common tool used to increase the performance of a solution. There are many sorting algorithms, but the most popular for interviews are listed below. Know how to implement all of these without looking anything up.
Quick Sort
Merge Sort
Topological Sort
Counting Sort
Recursion is an extremely important topic that doesn’t come up as much in day to day software engineering as it does during interviews. Bit manipulation may seem scary at first, but once you take time to understand the binary number format and operations you’ll realize how simple it is.
Recursion
Greedy Algorithms
Dynamic Programming
Bit Manipulation (AND, NOT, OR, XOR)
These patterns can be used to solve many similar algorithms questions
Backtracking
Two Pointers
Sliding Window
Divide & Conquer
Reservoir Sampling
Permutations
Combinations
Factorial
Power Set
String to Integer
Integer to String
Adding huge numbers (that can’t fit into memory)
Addition/Subtraction/Multiplication/Division without using operators
As weird as it sounds, it’s true that it’s not enough to just provide a working solution to problems during the interview. The code has to run at a certain level of performance described by “time complexity” & “space complexity”. The complexity is described in terms of Big-O notation.
This may seem complex at first (especially given the name) but the reason most people have trouble with it is because they don’t take time to actually learn and just go by intuition after seeing a few examples. Rather than rely on intuition, read up on Big-O notation and how to determine the complexity of an algorithm. Oftentimes your interviewer will ask you to tell them what the time and space complexity of your solution is.
Self Practice
Studying means nothing without practice. Every time you learn a new topic from your study plan, you should put it to use. That’ll help you remember it longer and also give a deeper understanding. Do a few practice questions for every topic you finish. Sites like leetcode.com let you search for practice questions using tags like “trees” or “graphs”.
Practice should happen in two phases. The first is when you learn the topic for the first time. During this phase you should focus on really understanding whats involved and why your solution works. The second phase is after you’re comfortable with the concepts. At this point you should time yourself and aim for faster and faster solution times.
During an interview you’ll be expected to solve a problem within 15–45 minutes depending on the difficulty of the question. When you start out, it’ll likely take hours for you to do the first one. Over the first few weeks that time should start to come down. After a month or two of consistent practice (not just time passing), you should start being able to solve a decent amount of problems on time.
Sometimes an entire interview question will only involve implementing a single data-structure such as an LRU Cache or a Trie. Other times it’ll only involve implementing a single operation on a data-structure such as the delete operation on a Binary Search Tree.
Practice implementing all of the data-structures mentioned earlier in this article until you don’t need to look anything up and you will have a very easy time with these questions during the real interview. Focus on understanding why its implemented the way it is rather than trying to remember the exact code. Implement from understanding of what needs to happen next and not from memory.
You probably won’t be asked to implement an Array or balanced BSTs like AVL or Redblack trees but you should know how they work.
Assisted Practice (Mock Interviews)
Practicing topics and questions alone isn’t enough. During the interview you’ll be interacting with a real person who is judging your skills in real-time. The situation is more stressful than when you study at home. To get around the awkwardness and anxiety of a real interview, you should do many practice interviews beforehand. This will help you be comfortable so that you can focus on the interview question rather than being distracted by non-technical things.
These types of practice interviews are called Mock Interviews. You can have a friend help you or find a service online that’ll match you with an interviewer.
You’ll never feel “ready” no matter how long you study. Theres always more topics to dive deeper into or weak areas that could use more practice.
There is definitely an element of luck in the whole process. It’s very possible that you get a question on a topic you haven’t prepared for at all or are really weak on. It’s also possible that you get all questions on topics you’re really strong in since two months ago and didn’t need to spend that extra time studying to pass. You can’t prepare for every possible outcome, but your chances of success get higher than everyone else’s with more practice.
Keeping track of your progress and getting feedback is very important in knowing when you’re truly ready to perform on the real interview without relying on just emotion.
Keep track of your completion times when you do practice questions and aim for at most 40 minutes to complete most medium level questions and 1 hour to complete hard level questions on sites like leetcode.com or hackerrank.com.
Realize that you must pass every edge case for it to count on those sites but luckily this isn’t the case for real interviews! Most interview code is evaluated on a small set of edge cases and small errors get passed or considered to be irrelevant all the time. The point of evaluation isn’t to be so strict as to expect perfection, but they need to see enough “signals" to be convinced.
Do at least three mock interviews before you do the real one. Only move forward when you can consistently perform well during practice.
Big tech companies hire non-stop so they’re extremely flexible on scheduling or rescheduling your interview date. I rescheduled my interviews with Google and Uber by 2 and 1 months respectively because I wasn’t ready. I’ve done even longer push backs in the past.
You don’t need any special excuse to reschedule an interview. I simply told them “I need more time to prepare”. These companies dedicate a lot of money for your interview. 5-6 full-time employees get paid to interview you for 4-5 hours and then evaluate the results after. Factor in the salaries of recruiters who took time to find you and process only a small % of applications for people they interact with and that’s at least a few thousand dollars per interview.
They want you to come prepared. They will wait rather than waste time, money and the opportunity cost of rejecting an engineer who could’ve passed if they just had waited an extra month or two. So push back your interview if you’re not ready. Never go in without being ready!
If you follow the above, knowing when you’re ready is easy. You might still feel you aren’t but you’ll know for sure because you’re hitting your completion times and have passed many mock interviews. Being ready means you’ve proven undoubtedly through practice that you can pass interviews that ask the same types of difficult questions under the same time limits as the real one.
This article only focuses on data-structures and algorithms questions. System Design and Behavioral questions also play a large role in the hire decision. I’ll leave those topics for another article.
For more tips check out this podcast interview I did about getting your resume noticed by employers, prepping for technical interviews and negotiating offers.
All of the topics you need to know along with resources explaining them are freely available online. Google searching any of the topics mentioned in this article, even the obscure ones like “two pointers” will yield a wealth of information about them. You don’t need a special college education, lucky genes or a long track record of success to get a job at a top tech company. The only thing you need is to dedicate time to consistent study and practice.
At the time of writing, we have 1,500+ black software engineers studying and helping each other with data-structures and algorithms. If you are an underrepresented person of color in tech who needs help studying or is in a position to help others study, please join us! Otherwise please share the group with someone who has the time or needs the help.
from Medium https://medium.com/swlh/how-to-study-for-data-structures-and-algorithms-interviews-at-faang-65043e00b5df
Dark Mode has swallowed the world. It’s probably the most requested feature in any app or website, and every designer’s passion project. Let’s dive deep into its benefits, disadvantages, and what you should consider when creating a dark theme.
Atmos dark mode UI
Pros and Cons of Dark Theme
A dark theme has real benefits (and some disadvantages) that make it a viable feature to consider adding to your UI. Let’s look at a few of them closely.
Pro: Reduced eye strain
Dark themes can reduce eye strain, especially when in a dark environment. But when used in bright environments, it can have the opposite effect. To avoid straining the eyes of your users, offer an easy way of switching modes or an even better option – to sync with the system theme.
Pro: Energy savings
Another benefit of dark mode is that it can reduce battery usage. Users with OLED screens can enjoy the ability to turn off black pixels and save energy. You don’t even need to use pure black, dark grays also enjoy decreased power usage. For example, Google’s recommended surface color #121212 uses just 0.3% more power than pure black.
Con: Motion blur
Dark theme can create issues with motion blur for users with OLED displays. When the UI is moving around, the LEDs are turning on and off, which causes motion blur. This is mostly an issue when using pure black with a lot of movement.
Con: Decreased reading comprehension and speed
Some companies claim that Dark mode can also increase focus and productivity. However, several studies have found that people have better reading comprehension when reading text with positive polarity (dark text on light background). Find out more in this study on pupil size and proofreading performance or another one about how color combinations affect reading speed.
Create your palette in minutes
Whether you’re new to color palettes, or a pro looking for advanced tools, create your best palette in minutes.
When creating your dark mode palette, a lot of the principles for light mode apply. But there are some dark theme-specific things to consider.
1. Avoid using saturated colors
Saturated colors create optical vibrations when on a dark background, causing eye strain. It can also be hard to pass accessibility standards with saturated colors on dark backgrounds.
Desaturate colors to make them easy on the eyes, with enough contrast against the dark surface. How much saturation is enough? In general, your colors should have around 20 points lower saturation on dark mode than on light mode. See below how Google approached their theme colors.
Comparison of saturation between light and dark mode of Material 3 color palette
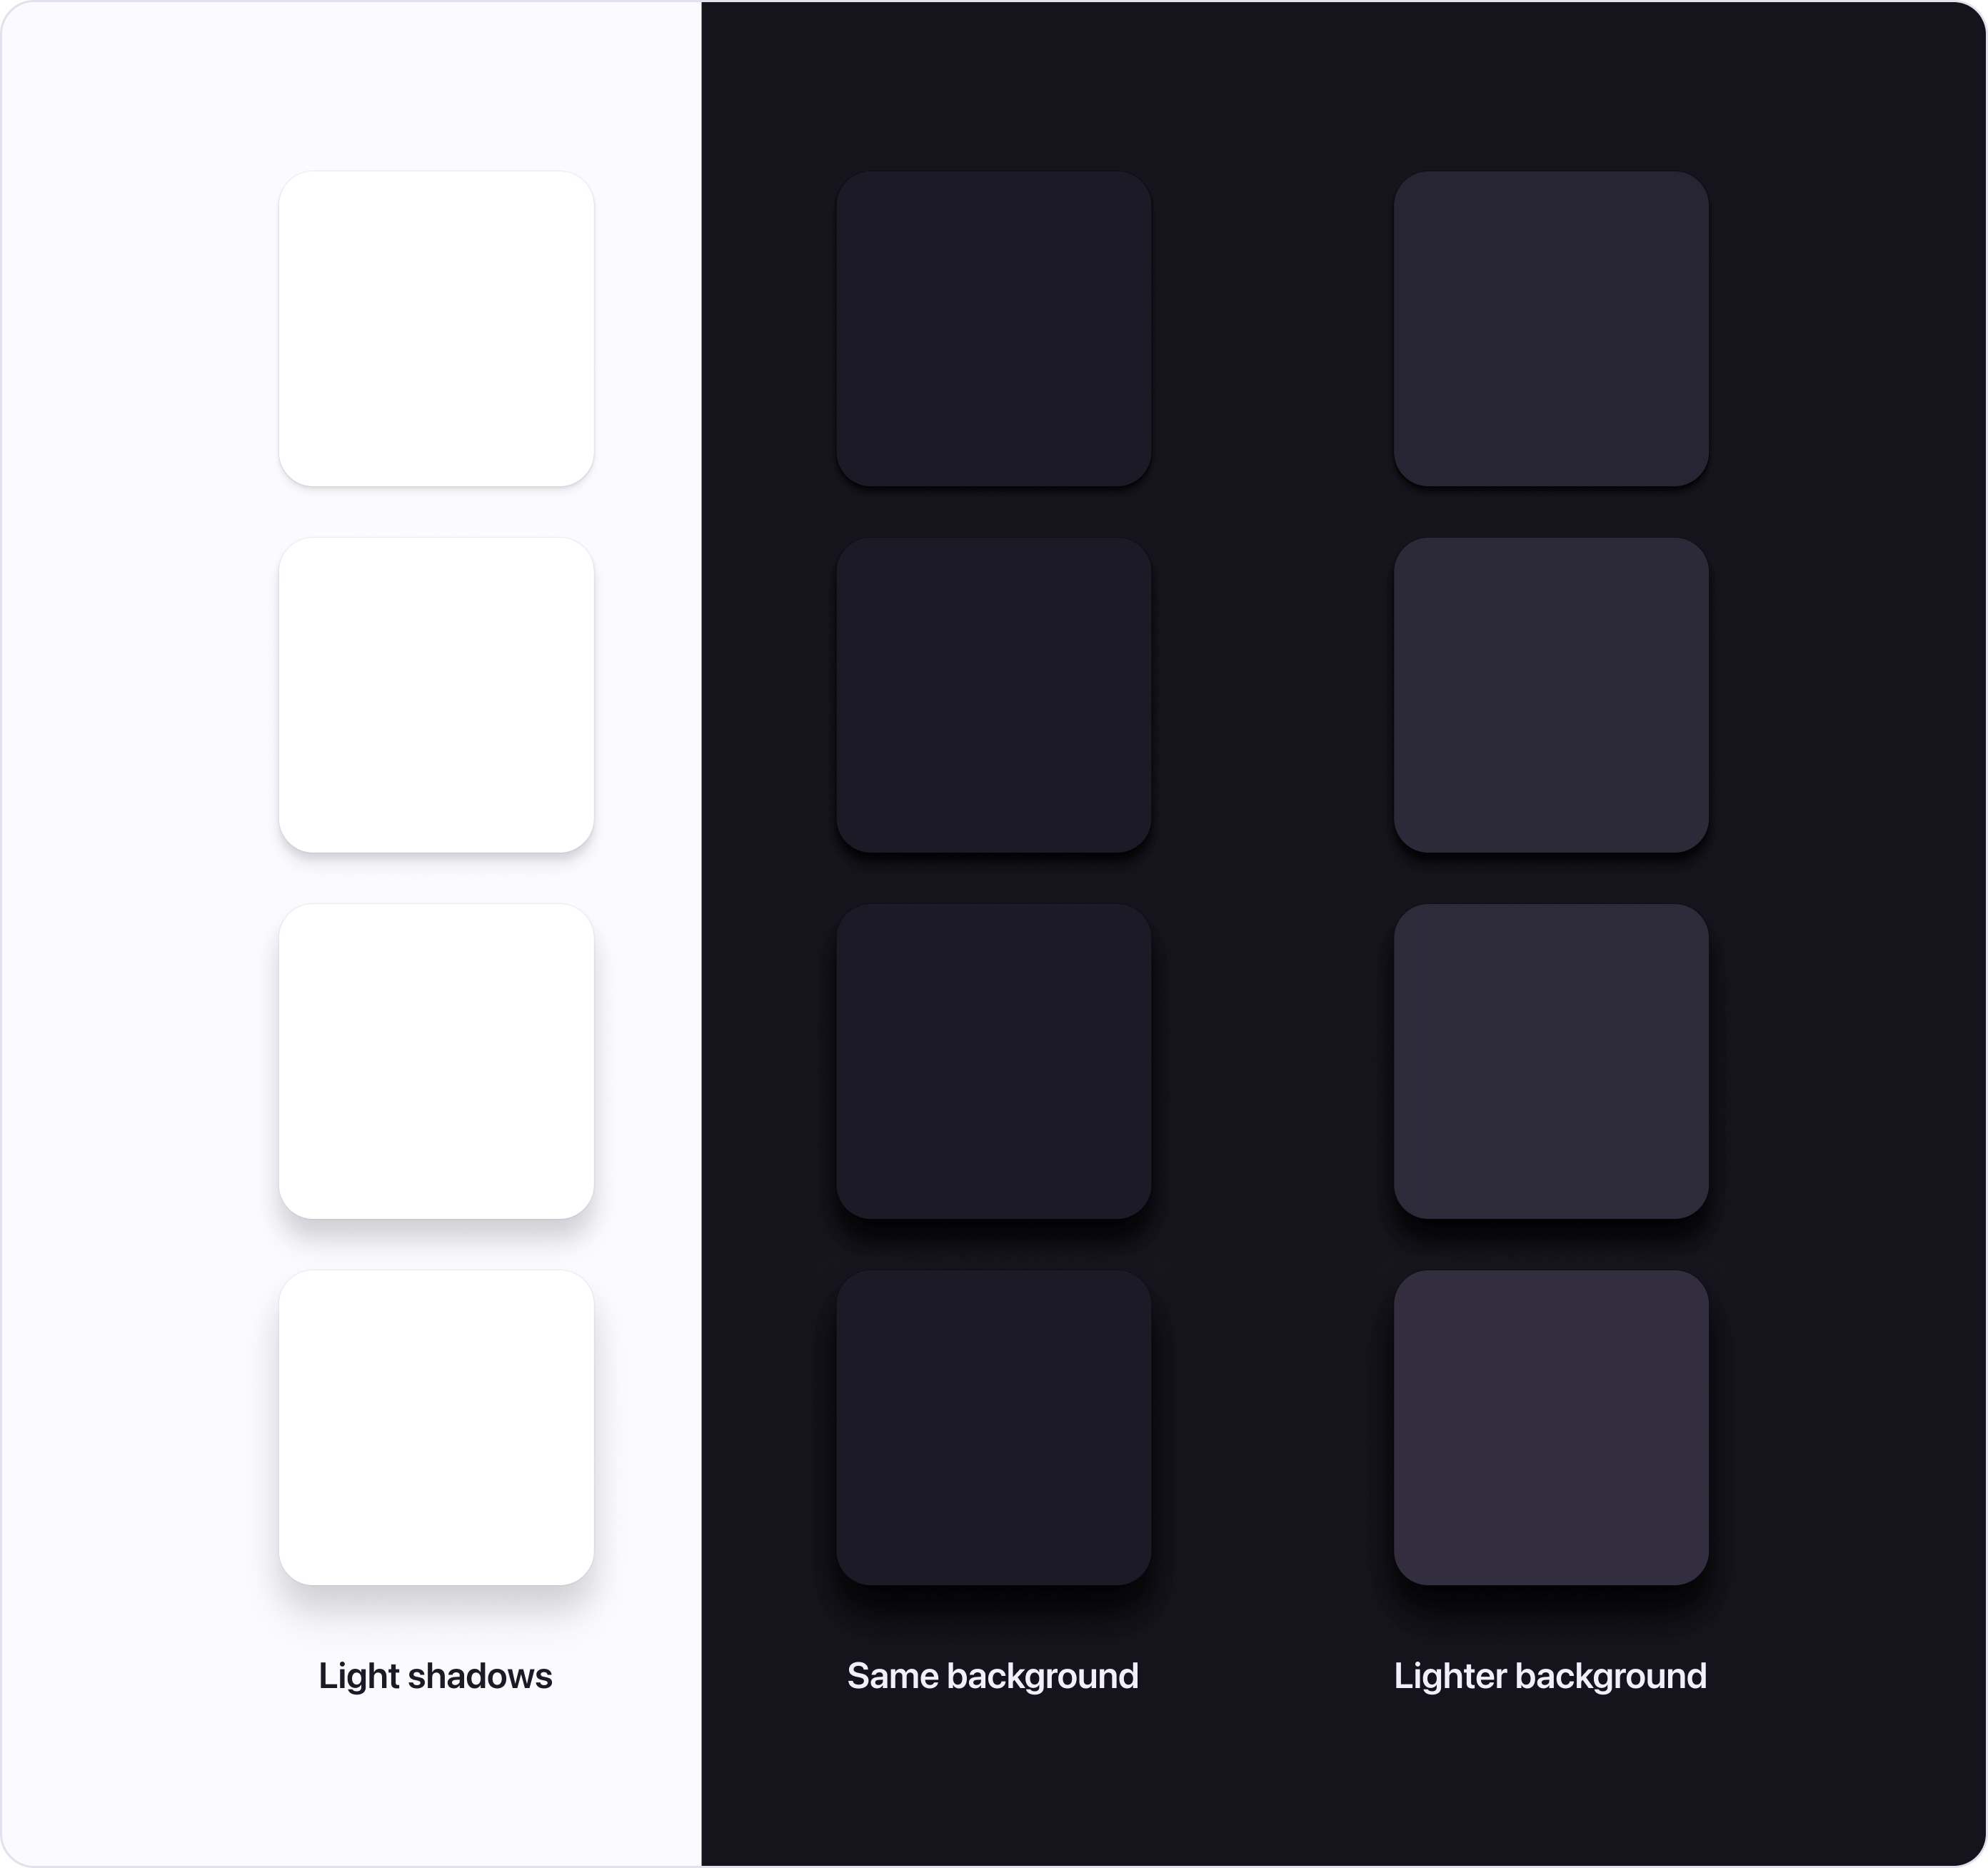
2. Communicate elevation with lighter surfaces
In light mode, we usually use shadows to communicate depth. The higher the surface is, the closer it is to the light source and the bigger shadow it casts. While this approach wouldn’t work in a dark mode, we can use the same “light source” theory and apply it to the surface color.
So instead of changing only the shadow size, we can also make the surface lighter the higher it is. Think about the light source being closer and shining brighter on the surface.
3. Avoid pure black surfaces
Your first instinct might be to choose pure black as the default surface color. But be careful, white text on a black background has such a high contrast that it might be hard to look at.
Choose dark grays for your default surface color. White text on a dark gray background has lower contrast and is easier on the eyes. Another advantage is that you will be able to use shadows on dark gray surfaces.
4. Avoid pure white
Same as pure black isn’t ideal for a dark theme, bright white can glow too much in a dark UI, creating a jarring effect. Use a slightly darker shade of white to soothe the eye.
5. Don’t just invert the color scheme
Inverting your existing light mode scheme to create a dark mode doesn’t necessarily mean the result will have high contrast. Be patient and create a dark mode-specific color palette that has enough contrast and is pleasant to the eye.
6. Make sure browser focus indicators are visible
Many people only use keyboards to navigate apps. They use commands and focus indicators to move around the screen. If these focus indicators aren’t visible, these users can’t enjoy your app.
Keyboard focus indicator in Atmos
7. People with astigmatism could have issues with Dark mode
Dark UI causes the iris to open up more to allow more light in. For users with astigmatism, this can deform their lens and make white text bleed into the dark background. This is known as the halation effect. For content heavy UI offer a way to switch to light mode to accommodate users with astigmatism.
Which text is easier to read?
Going Dark Mode only
In some cases, you can choose to go with only a dark appearance for the whole interface. Consider carefully if it is the right choice for your use case.
For example, websites usually don’t come with the option to switch modes, since the colors are part of the branding expression. Another example could be an app for watching movies (like Netflix) where you would want the UI not to distract the users from the viewing experience.
Conclusion
As you can see, designing dark mode isn’t the same as light mode. There are several dark mode-specific considerations you need to make to create a great looking and accessible dark mode theme.
Are you working on a dark mode theme for your designs? Try Atmos the tool for creating color palettes.
from Sidebar https://atmos.style/blog/dark-mode-ui-best-practices
Dive into a fantastic collection of new patterns for amazing apps, including clipboard patterns, file patterns, and advanced app patterns.
No matter what you build—be it a next generation video editing app, an addictive word game, or a future online social networking app—you will always find yourself in need of a few basic building blocks:
The video editing app will probably allow the user to save the edited video.
Your game will maybe allow the user to share game progress with friends.
An online social networking app will highly likely allow the user to paste images into a post.
These were just a couple of examples of such patterns, and there are many more. But all of these have one thing in common: there is no universal way to realize them.
For example, not all browsers implement the Web Share API, so in some cases you will have to fall back to a different approach, like Twitter’s Web Intents, or copying to the clipboard, which is the approach chosen in Wordle when the Web Share API isn’t implemented. Phew, barely got this one:
When it comes to saving, the go-to approach is to use the File System Access API, so you end up with a FileSystemFileHandle, which allows you to implement a true save, edit, save flow. The next best thing is to fall back to a classic <a download>, which likewise lets the user save data, but has the downside of creating new files on each download, so they end up with my-video.mp4, my-video (1).mp4, my-video (2).mp4, etc.
To conclude the introductory examples, not all browsers support pasting images into a web app, so you can fall back to using the Drag and Drop API or showing a file picker, which is not as elegant as the Async Clipboard API, but at least it works.
Advanced apps patterns for everything concerned with advanced app features like providing app shortcuts, periodically syncing data in the background, showing app badges, and many more.
I hope these patterns will help you build amazing apps, and I’m looking forward to your feedback! You can provide feedback by tweeting at @ChromiumDev or filing an Issue. In both cases, tag @tomayac to make sure I see it.
Learn how your company can create applications to automate tasks and generate further efficiencies through low-code/no-code tools on November 9 at the virtual Low-Code/No-Code Summit. Register here.
In Gartner’s Leadership Vision for 2022: Infrastructure and Operations report, Gartner analysts Nathan Hill and Tim Zimmerman share that in 2022, “infrastructure and operations leaders must deliver adaptive, resilient services that support continuous and rapid business change.”
In a similar vein, VentureBeat’s top trending stories on infrastructure from the past year have focused on the resiliency, adaptivity, integrity, interoperability, and flexibility of infrastructure and data. Improving infrastructure across industries is necessary to increase innovation and efficiency globally.
Can open-sourcing agriculture infrastructure optimize crop growing?
Earlier this year, the Linux Foundation unveiled an open source digital infrastructure project aimed at optimizing the agriculture industry, known as the AgStack Foundation. It’s designed to advance collaboration among key stakeholders throughout the global agriculture space, ranging from private businesses to governments to even academia.
Across the agriculture sector, digital transformation has ushered in connected devices for farmers and myriad AI, as well as automated tools to bring optimization to crop growth and evade obstacles like labor shortages.
Event
Low-Code/No-Code Summit
Join today’s leading executives at the Low-Code/No-Code Summit virtually on November 9. Register for your free pass today.
In a May press release, the Linux Foundation outlined what may result from the initiative, which “will build and sustain the global data infrastructure for food and agriculture to help scale digital transformation and address climate change, rural engagement and food and water security.”
Introducing digital twins and strengthening infrastructure to improve systems and fight global crises like climate change isn’t unique to the Linux Foundation, however. In November at its GTC conference, Nvidia announced its creation of a digital twin of Earth, also aimed at using the technology to model potential improvements and solutions to apply in the real world.
The matchup of infrastructure improvements and incorporating digital twin technologies is sure to continue as global leaders aim to solve problems that were previously deemed next to impossible.
In the short term, these advancements will help address the loss of productivity and will lay the groundwork for further and larger-scale innovations by making access to open digital tools and data for revamping infrastructures, available to industry professionals.
The vitality of infrastructure-as-a-service
Rescale, a San Francisco-based startup developing a software platform and hardware infrastructure for scientific and engineering simulation, used funding it raised earlier this year to further the efforts of its research, development, and expansion. Since then, the company has signed new partnerships and catapulted to explosive growth. In November, Rescale was named as one of Deloitte’s 2021 Technology Fast 500 fastest-growing companies.
The fast-paced growth should be unsurprising, given the company’s focus on providing infrastructure-as-a-service, in what has progressively become a digital-first world for workplaces spanning across industries.
Since the COVID-19 pandemic has shifted several industries and businesses online, partially — and in many cases, fully — infrastructure has proven to be a core component to successful operation.
“Industries like aerospace, jet propulsion, and supersonic flight all require massive computer simulations based on AI and specialized hardware configurations. Historically, the science community has run these workloads on on-premises datacenters that they directly built and maintain,” a Rescale spokesperson told VentureBeat via email last February. “Rescale was founded to bring HPC [high-performance computing] workloads to the cloud to lower costs, accelerate R&D innovation, power faster computer simulations, and allow the science and research community to take advantage of the latest specialized architectures for machine learning and artificial intelligence without massive capital investments in bespoke new datacenters.”
Rescale hopes to enable customers to operate jobs on public clouds such as Amazon Web Services, Microsoft Azure, Google Cloud Platform, IBM, and Oracle — and it additionally makes a network available to those customers across eight million servers with more than 80 specialized architectures and resources like Nvidia Tesla P100 GPUs, Intel Skylake processors, as well as additional features.
The hype for larger industry use cases is big. Rescale’s infrastructure-as-a-service supports approximately 600 simulation applications for aerospace, automotive, oil and gas, life sciences, electronics, academia, and machine learning, including desktop and visualization capabilities that let users interact with simulation data regardless of whether the jobs have finished. This, in turn, allows professionals from nearly every sector to utilize testing, simulations, modeling, and more to improve their own products, services, and tools that are B2B or B2C-facing.
Scaling infrastructure for a cloud-centric world
APIs and microservices have become critical tools to drive innovation and automation for companies, but also bring management challenges. It’s natural that enterprises are drawn to services that offer the potential to create greater flexibility, but in doing so, they must also find ways to coordinate with cloud-based services.
Kong is one of several new companies aiming to address the issue. Because many of the conveniences of our digitally connected lives rely on APIs that connect companies with vendors, partners, and customers — like using Amazon’s Alexa to play music over your home speakers from your Spotify account, asking your car’s navigation system to find a route with Google Maps, or ordering food for a night in from DoorDash — it would be next to impossible to do all of this efficiently and at scale without APIs and cloud technologies.
Kong’s flagship product, Kong Konnect, is a connectivity gateway that links APIs to service meshes. Using AI, the platform eases and automates the deployment and management of applications while bolstering security. Among its notable customers are major household names including GE, Nasdaq, and Samsung — with others to surely follow in 2022.
Managing the ever-changing landscape of infrastructure
If there is anything the past years have made clear, it’s that the importance and reliance on technology, regardless of industry, is increasing, and hyperconnectivity in our lives both individually and professionally is here to stay.
There is no shortage of competitors for Rocket Software. Tools and technologies to manage IT infrastructure are ever-present in the enterprise computing sector — spanning from public clouds to the edge. The management of data and the apps used to create that data are becoming more disaggregated with the influx of companies and individuals moving everything online. Expect the industry to demand more sophisticated tools that can efficiently and reliably manage infrastructure in this evolving space.
Nvidia and Bentley team up to streamline U.S. infrastructure
In April, Bentley Systems forged several partnerships that make it easier to share realistic construction simulations with a broader audience. This goal is to help drive the adoption of digital twins, which have increasingly been used for advanced simulations across the construction industry.
Bentley, a leader on the technical side of modeling infrastructure, extended its digital twins platform to support the Nvidia Omniverse ecosystem. The integrations should make it easier to share realistic models to stakeholders, including decision-makers, engineers, contractors, and citizens affected by new projects.
Bentley’s software — which is part of the State of Minnesota’s plans to save more than $4 million per year using the company’s tools to improve inspection and documentation of 20,000 bridges — is just an example of the efficiency that may come for the country as a whole.
“The integration of the capabilities of the Bentley iTwin platform and Nvidia’s Omniverse [will] enable users to virtually explore massive industrial plants and offshore structures as if they are walking through the infrastructure in real time, for purposes such as wayfinding and safety route optimization. The industry is moving in a positive direction toward more automated and sophisticated tools that improve client outcomes,” according to a press release on the partnership between Bentley and Nvidia.
VentureBeat’s mission is to be a digital town square for technical decision-makers to gain knowledge about transformative enterprise technology and transact. Discover our Briefings.
from VentureBeat https://venturebeat.com/data-infrastructure/the-5-most-popular-infrastructure-stories-of-2021-and-what-they-reveal-about-2022/
Make room on the runway, Armani, Versace and Ralph Lauren.
Fashion is being democratized — and its future is virtual and moving to the metaverse.
“The world’s next Coco Chanel might be a young, 10-year-old, 8-year-old girl designing clothes in Roblox,” Cathy Hackl, chief metaverse officer and co-founder of innovation and design consulting company Journey said in a discussion at this week’s virtual MetaBeat event.
Fashion and technology are converging in both physical and virtual spaces, she said — and this isn’t only changing who is a fashion designer, but who can say they are one.
“It’s truly amazing to watch fashion and art pushing the limits of what we can do with this technology,” said Hackl. “It’s this moment and this feeling in the tech industry and the fashion industry of coming closer together than ever before.”
For instance, Journey helped Walmart build Walmart Land and Walmart’s University of Play, two “new immersive experiences” within Roblox. The retail giant announced the new virtual endeavors this week, describing them as “bringing to life the best of Walmart’s ‘isles’ in a virtual world.”
“Walmart Land will bring the best fashion, style, beauty and entertainment items directly to the global Roblox community of over 52 million daily users,” the company announced in a blog post. “The retailer will continue to bring the fun with Walmart’s Universe of Play — the ultimate virtual toy destination in Roblox, just in time for those oh-so-real holiday wish lists.”
Users can explore a virtual store of merchandise, or “verch” for their avatars, ride Ferris wheels and play games and participate in competitions to earn tokens and badges. There’s also an “Electric Island” music festival with an interactive piano walkway, a dance challenge, a Netflix trivia experience with actor Noah Schnapp and a DJ booth where users can learn to mix different beats. This will host an “Electric Fest” in October, a motion-capture concert featuring artists Madison Beer, Kane Brown and YUNGBLUD.
Meanwhile, a “House of Style” will offer products from af94, UOMA by Sharon C., ITK by Brooklyn and Bailey, Lottie London and Bubble, and will feature a virtual dressing room, a strike-a-pose challenge, a cosmetics obstacle course and a roller-skating rink.
This entrance of one of the world’s largest companies into the metaverse is nothing less than a landmark event, said Hackl.
“It’s the Fortune 1, massive retailer entering the space in a way that feels organic and well done,” she said.
Making the impossible, possible
Meanwhile, Amsterdam-based digital fashion platform Fabricant Studio debuted its first collection in November; Hackl participated by co-creating the “Godmother of the metaverse gown.”
“It was a beautiful moment for me,” she said, as she never dreamed that she could ever design couture.
The metaverse is “making the impossible possible, making the unthinkable completely at your fingertips,” agreed Sasha Wallinger, head of Web3 and metaverse strategy at Journey.
Wallinger described a “fashion language” of thinking several seasons ahead, ‘breaking to build’ and experimenting — much like the evolving metaverse experience.
The metaverse is “a new tool, a new mechanism of taking a risk, but having a really high reward in that risk,” she said. “It’s really truly bringing the fun back to that creative experience, that marketing journey.”
No doubt, marketing and sales can often become stale, she said, but the metaverse is reinventing and innovating branding and development.
And, while that can be about building “beautiful worlds” of gaming, it can also include building communities and events as Walmart has, Hackl pointed out.
No doubt, the metaverse is still being built itself, and much like the World Wide Web, it’s unclear how it will take shape, morph and evolve.
“Will we call it metaverse in 10 years? I don’t know,” said Hackl. But in any case, “in the metaverse, we are all world builders and now is our time to build.”
VentureBeat’s mission is to be a digital town square for technical decision-makers to gain knowledge about transformative enterprise technology and transact. Discover our Briefings.
from VentureBeat https://venturebeat.com/virtual/how-the-metaverse-is-democratizing-the-fashion-world/
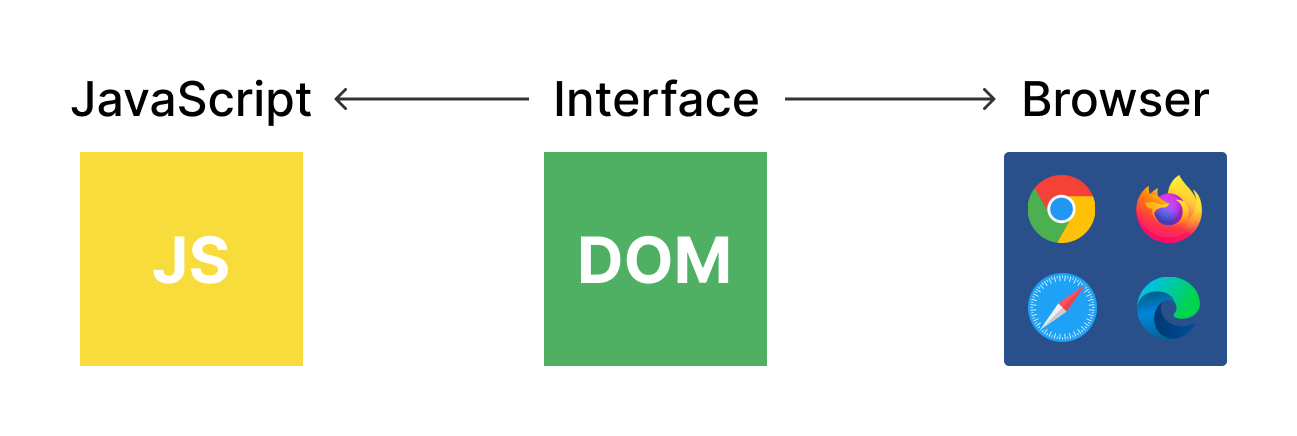
Understanding how the DOM and events work in JavaScript is key if you want to be an effective front end developer.
In this article, you’ll learn what the DOM is and how it works.
What is the DOM?
DOM stands for Document Object Model. It’s the interface between JavaScript and the web browser.
With the help of the DOM, you can write JavaScript to create, modify, and delete HTML elements, set styles, classes and attributes, and listen and respond to events.
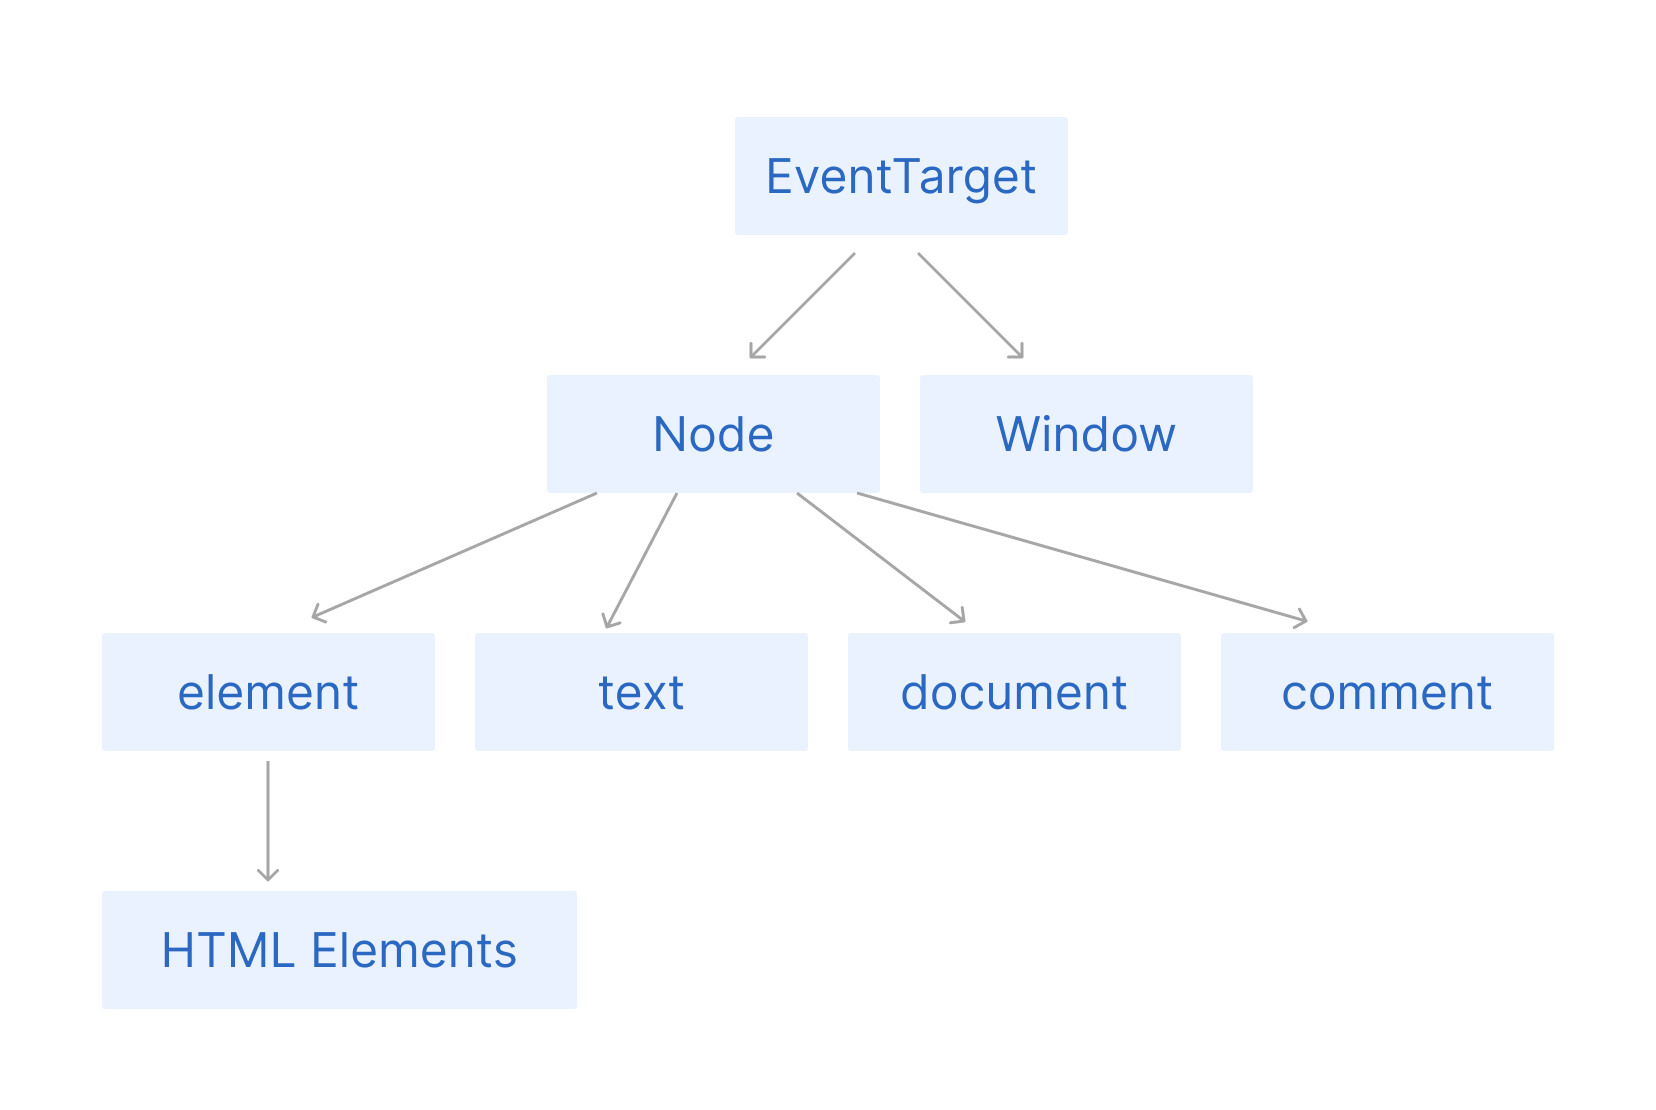
The DOM tree is generated from an HTML document, which you can then interact with. The DOM is a very complex API which has methods and properties to interact with the DOM tree.
The DOM is organized in a really clever manner. The parent element is called the EventTarget. You can understand better how it works with the help of the below diagram:
The EventTarget interface is implemented by objects which can receive events and may have listeners for them. In other words, any target of events implements the three methods associated with this interface. Element, and its children, as well as Document and Window are the most common event targets, but other objects can be event targets, too.
Window represents the browser’s window. All global JavaScript objects, functions, and variables automatically become members of the window object. Global variables are properties of the window object. Global functions are methods of the window object. Even the document object (of the HTML DOM) is a property of the window object.
window.document.getElementById("header");

// Both are same

document.getElementById("header");
Nodes are in the DOM aka Document Object model. In the DOM, all parts of the document, such as elements, attributes, text, and so on are organized in a hierarchical tree-like structure that consists of parents and children. These individual parts of the document are known as nodes.
The Node in the above diagram is represented by a JavaScript object. We mostly work with the document which has most commonly used methods like document.queryselector(), document.getElementBy Id(), and so on.
Now we will take a look at the document.
How to Select, Create, and Delete Elements Using the DOM
With the help of the DOM, we can select, delete, and create element in JavaScript.
How to Select Elements
There are multiple ways we can select HTML elements in JavaScript. These are the methods we’ll look at here:
document.getElementById();
document.getElementByClassName();
document.getElementByTagName();
document.querySelector();
document.querySelectorAll();
How to use the document.getElementById() method
The getElementById() method returns an element whose id matches a passed string. Since the ids of HTML elements are supposed to be unique, this is a faster way to select an element with ids.
Example:
const ele = document.getElementById("IDName");
console.log(ele); // This will log the whole HTML element
How to use the document.getElementByClassName() method
The document.getElementByClassName() method returns an HTMLCollection of elements that match the passed class’s name. We can search for multiple class names by passing the class names separated by whitespaces. It will return a live HTMLCollection.
So what does it mean that the HTMLCollection is “live”? Well, it means that once we get the HTMLCollection for a class name, if we add an element with the same class name, then the HTMLCollection gets updated automatically.
Example:
const ele = document.getElementByClassName("ClassName");
console.log(ele); // Logs Live HTMLCollection
How to use the document.getElementByTagName(); method
The document.getElementByTagName() method returns the HTMLCollection of elements that match the passed tag name. It can be called on any HTML element. It returns an HTMLCollection which is a live collection.
Example:
const paragraph = document.getElementByTagName("p");
const heading = document.getElementByTagName("h1");

console.log(paragraph); // p element HTMLCollection
console.log(heading); // h1 element HTMLCollection
How to use the document.querySelector() method
The document.querySelector() method returns the first element that matches the passed selector. Now here, we can pass classname, id, and tagname. Take a look at the below example:
const id = document.querySelector("#idname"); // using id
const classname = document.querySelector(".classname"); // using class
const tag = document.querySelector("p"); // using tagname
Rules for selection:
When selecting using class, use (.) at the start. For example (“.classname”)
When selecting using id, use (#) at the start. For example (“#id”)
When selecting using a tag, simply select directly. For example (“p”)
How to use the document.querySelectorAll() method
The document.querySelectorAll() method is an extension of the querySelector method. This method returns all the elements that match the passed selector. It returns the Nodelist collection which is not live.
const ele = document.querySelectorAll("p");
console.log(ele); // return nodelist collection of p tag
NOTE: HTMLCollection is a live collection, while the Nodelist collection is a static collection.
How to Create Elements
You can create HTML elements in JavaScript and add them to HTML dynamically. You can create any HTML element with document.createElement() by passing the tag name in parenthesis.
After you create the element, you can add the classname, attributes and textcontent to that element.
Here’s an example:
const ele = document.createElement("a");
ele.innerText = "Click Me";
ele.classList.add("text-left");
ele.setAttribute("href", "www.google.com");

// update to existing element in HTML
document.querySelector(".links").prepend(ele);
document.querySelector(".links").append(ele);
document.querySelector(".links").befor(ele);
document.querySelector(".links").after(ele);

// Simalar to below anchor tag
// <a href="www.google.com">Click Me</a>
In the above example, we created an anchor tag in JavaScript and added attributes and a classname to that anchor tag. We have four methods in the above example to update the created element in the HTML.
prepend(): inserts the data at the top of its first child element.
append(): inserts the data or content inside an element at the last index.
before(): inserts the data before the selected element.
after(): puts the element after the specified element. Or you can say that it inserts data outside an element (making the content its sibling) in the set of matched elements.
How to Delete Elements
We know how to create elements in JavaScript and push them to the HTML. But what if we want to delete existing elements in the HTML? It’s easy – we just need to use the remove() method on that element.
Here’s an example:
const ele = document.querySelector("p");

// This will remove ele when clicked on
ele.addEventListner('click', function(){
	ele.remove();
})
How to Manipulate CSS from JavaScript
We know how to manipulate HTML from JavaScript. Now we will learn how to manipulate CSS from JavaScript. This can help you change the styling of your web pages dynamically.
For example, if you click on an element, its background color should change. This is possible by manipulating CSS from JavaScript.
When changing CSS properties using JavaScript, you need to make sure whenever there is a - in the CSS, you capitalize the next letter. For example, in CSS you would write background-color, but in JavaScript, backgroundColor (with a capital C).
Here’s an example:
const ele = document.querySelector("div");
ele.style.backgroundColor = "red";
Now suppose you already wrote CSS for your project and you wanted to add classes using JavaScript. We can do that using classList in JavaScript.
Here’s an example:
const ele = document.querySelector(".link");
ele.classList.add("bg-red"); // add class bg-red to existing class list
ele.classList.remove("pb-4");// remove class bg-red from existing class list
ele.classList.toggle("bg-green"); // toggle class bg-red to existing class list which means if it already exists then it will be removed, if it doesn't exist it will be added.
When we use classList it adds, removes, or toggles classes directly to the element. It’s like updating with existing classes.
Unlike element.className it removes all existing classes and adds the given class.
Here’s an example:
const ele = document.querySelector(".link");
ele.classList.add("bg-red"); // add class bg-red to existing class list
ele.classList.remove("pb-4");// remove class bg-red from existing class list

ele.className = "p-10"; // Now this will remove all existing classes and add only "p-10 class to element."
How to Use Event Handlers
The change in the state of an object is known as an Event. The process of reacting to the events is called Event Handling.
Events happen when a user does something like click, hover over an element, press a key, and so on. So when an event happens and you want to do a certain thing or manipulate anything, you use event handlers to trigger that event.
We use event handlers to execute certain code when that particular event happens. There are multiple event handlers in JavaScript (here’s a quick list of them), but you use the same process to add event handlers to any element.
Here’s the syntax:
const ele = document.querySelector("a");

ele.addEventListner("event", function(){
	// callback function
});
Some events you can use:
click
mouseover
mouseout
keypress
keydown
And here’s an example of using the “click” event:
const ele = document.querySelector("a");

ele.addEventListner("click", function(){
	ele.style.backgroundColor = "pink";
});
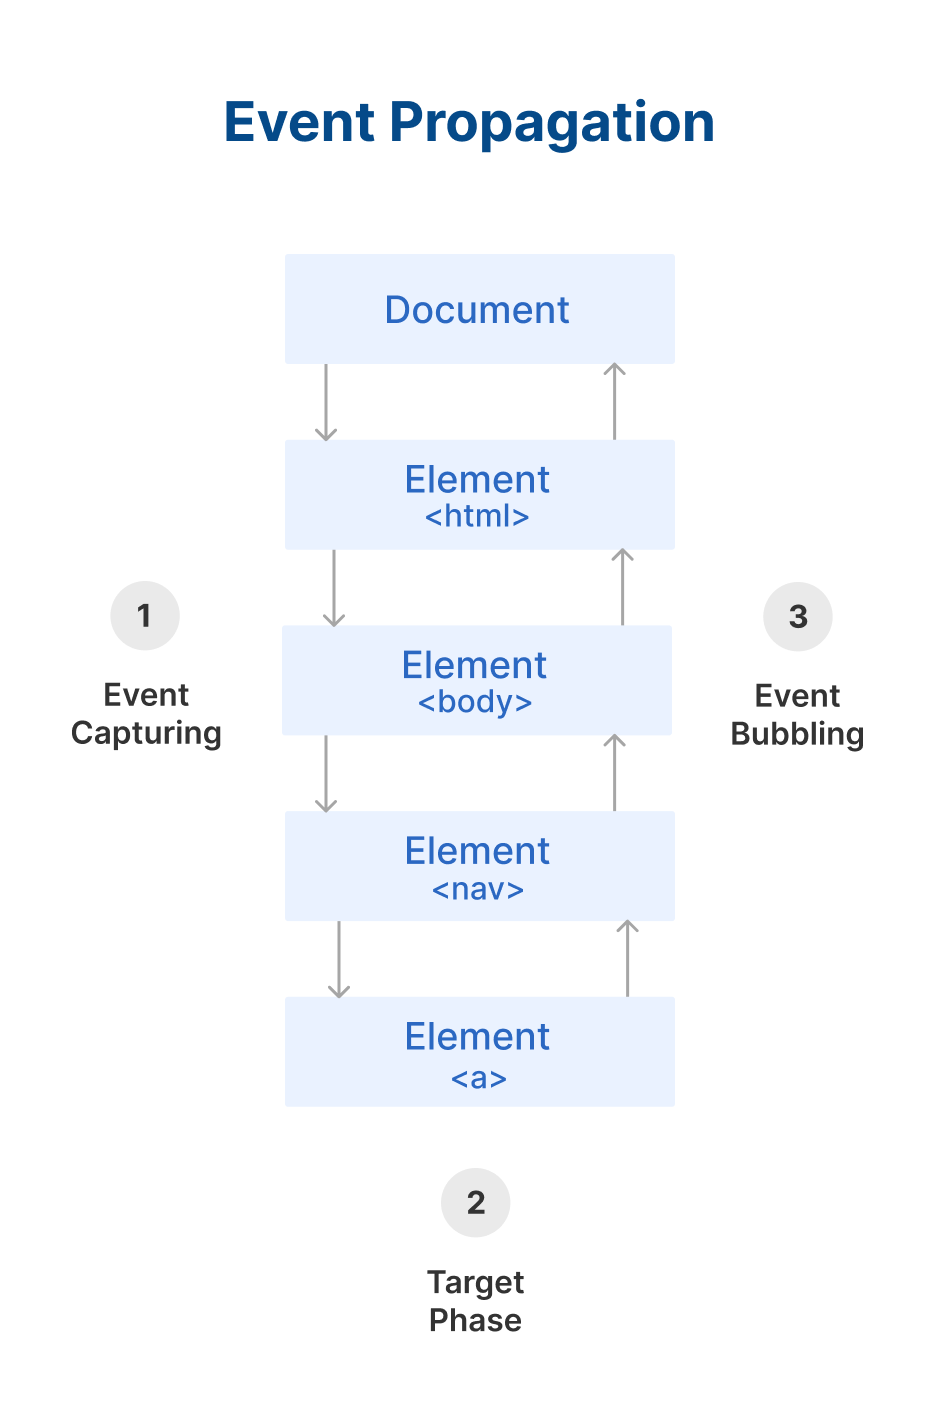
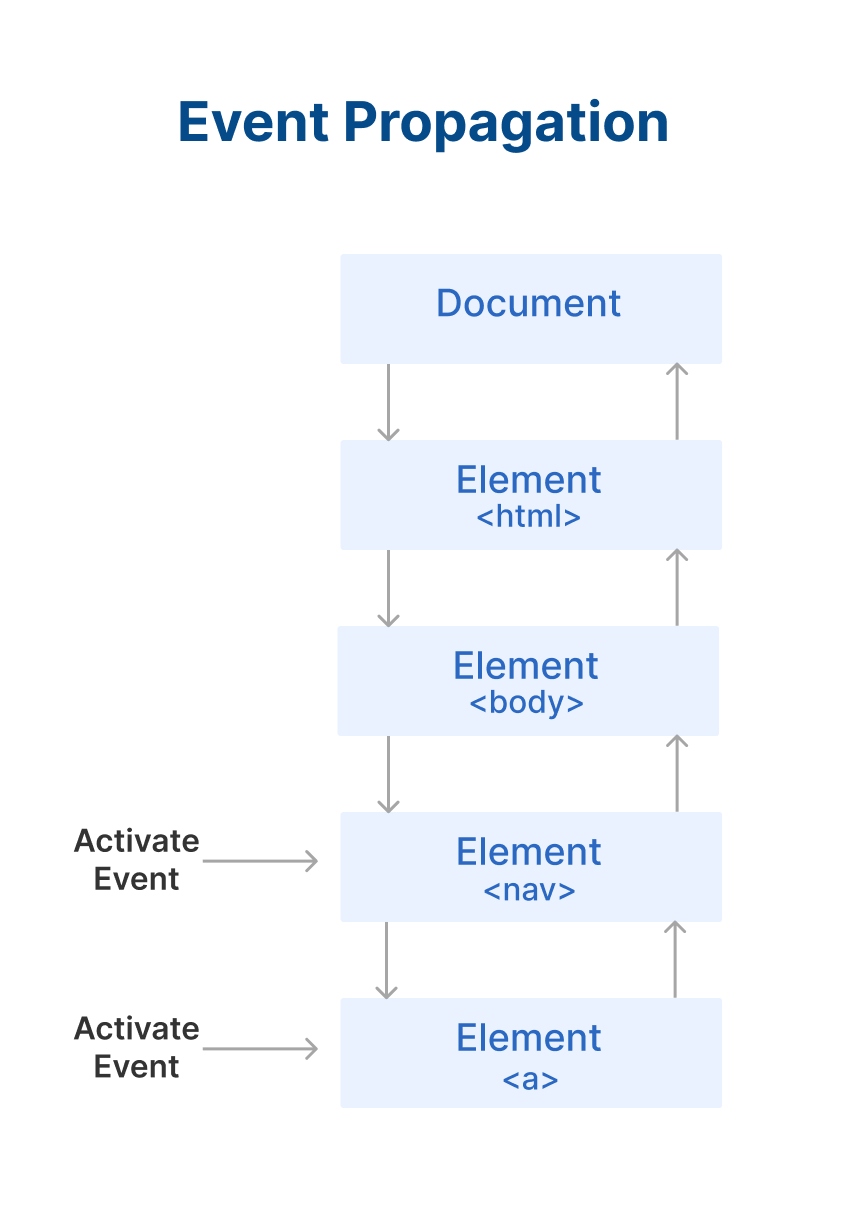
Event Propagation: Bubbling and Capturing
Event Propagation determines in which order the elements receive the event(s). There are two ways to handle this event propagation order in the DOM: Event Bubbling and Event Capturing.
What is Event Bubbling?
When an event happens on a component, it first runs the event handler on it, then on its parent component, then all the way up on the other ancestors’ components.
By default, all event handlers move through this order from center component event to outermost component event.
What is Event Capturing?
This is the opposite of bubbling. The event handler acts first on its parent component and then on the component where it was actually meant to fire.
In short, this means that the event is first captured by the outermost element and propagated to the inner elements. It is also called trickle down.
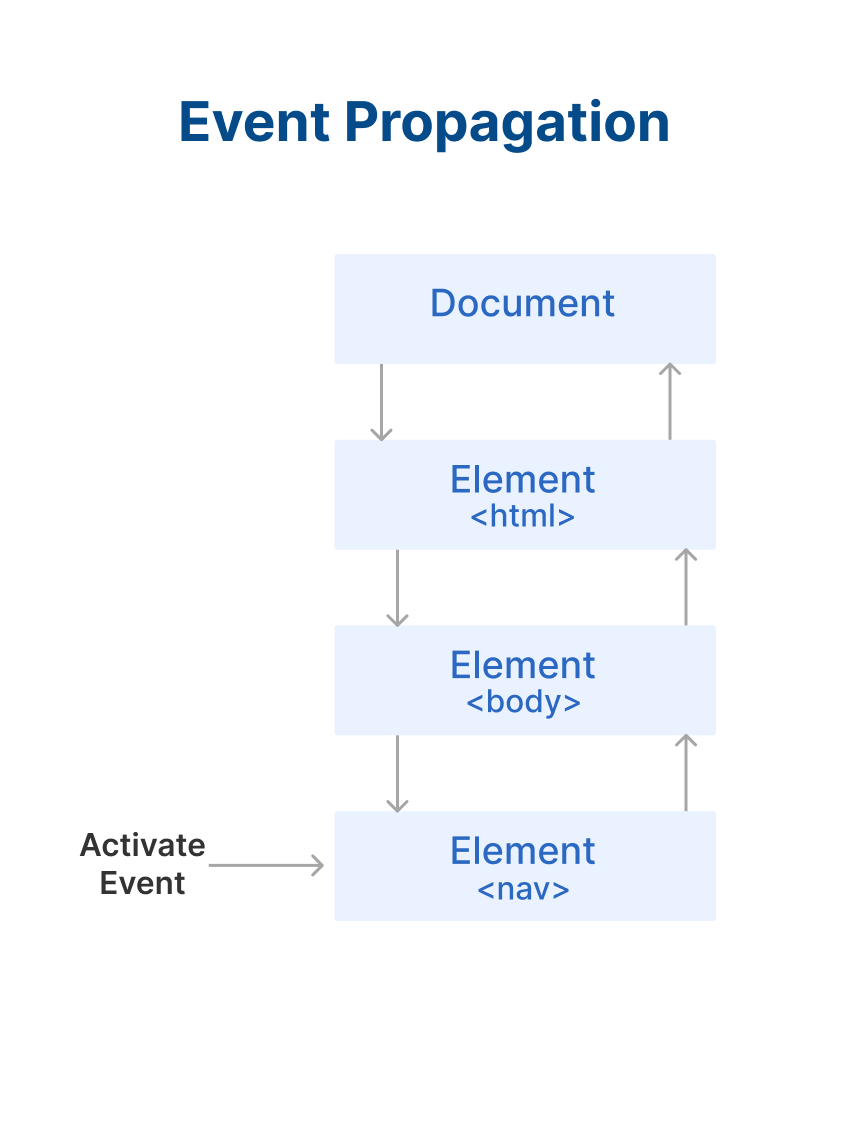
Now study above example carefully. I have added an event listener to the nav tag and to the anchor tag. When you click on nav, the background color changes to green. When you click on the anchor tag, the background color changes to pink.
But when you click on the anchor tag, the background color of anchor as well as nav changes. This is because of event bubbling.
This is what happens when you only click on the nav element:
This is what happens when you only click on the nav element.
This is what happens when you only click on the anchor element:
This is what happens when you only click on the anchor element
To stop event propagation, we can use stoppropagation() on the event listener because of which the event propagation is happing. It will prevent the nav element event listener from getting activated in the above example.
“A good JavaScript developer needs to know how to traverse the DOM— it’s the act of selecting an element from another element. ” – Zell Liew
Now we are going to see why traversing the DOM is better than using the document.querySelector() method, and how to traverse like a pro.
There are 3 ways to traverse the DOM:
How to traverse the DOM upward
There are two methods which help you traverse the DOM upward:
parentElement is a property that selects the parent element, like this:
const ele = document.querySelector("a");
console.log(ele.parentElement); // <div>
The parentElement is great for selecting one level upwards. But closest lets you find an element that can be multiple levels above the current element. closest lets you select the closest ancestor element that matches a selector.
Here’s an example of using closest:
<div>
    <h3 class="demo">This is sample</h3>
    <h1 class="demo">This is heading</h1>
    <h2 class="heading"> This heading 2</h2>
</div>
const ele = document.querySelector(".heading");
console.log(ele.closest(".demo")); // This is heading
In above code we are trying to get closest element to .heading which has a class of .demo.
How to traverse the DOM downward
We can traverse downward using the children method on a selector. With children you can select direct child of selected element.
Were you unable to attend Transform 2022? Check out all of the summit sessions in our on-demand library now! Watch here.
California is enacting “a sweeping plan to restrict and ultimately ban the sale of gasoline-powered cars,” which Governor Gavin Newsom described as the “beginning of the end for the internal combustion engine.” Where California leads, many others follow. However, at present, there is no technology available that will allow for the mass adoption of electric vehicles (EVs) at a price point that the average consumer can afford. While policies like California’s aim to accelerate the global transition toward electric vehicles, there are crucial missing pieces to this plan.
Electric vehicles: Batteries, barriers and bans
Let’s get clear about what we’re working toward and the barriers to getting there. Most electric vehicles today use a lithium-ion battery that requires cobalt and nickel to function for long-range travel, which means that their batteries and the cars are expensive. The batteries that do use low-cost materials lack the range to be competitive with internal combustion for everyday consumers.
Based on current technology, the world is not even close to being on track to achieving California’s goal of banning the sale of new gasoline-powered cars and light trucks by 2035. The industry hasn’t yet defined a profitable roadmap to get there.
Scale alone can’t solve this with current technology. At the moment, doing the same thing in ever larger and larger factories won’t help automakers or consumers. Cobalt and nickel are becoming scarcer and more expensive as demand grows. It’s uncertain whether global miners will even be able to keep up with demand for these materials at current growth rates, let alone the growth rates needed for 100% of new cars to be electric by 2035.
Event
MetaBeat 2022
MetaBeat will bring together thought leaders to give guidance on how metaverse technology will transform the way all industries communicate and do business on October 4 in San Francisco, CA.
Nickel prices soared from $29,000 a ton to about $100,000 in March 2022 and continue to fluctuate wildly. Cobalt mining is particularly problematic on ethical grounds, predominantly performed in the Democratic Republic of Congo in unregulated mines that lack adequate safeguards against child labor and corruption.
Electric vehicles still out of reach for most
Cheaper batteries depend on the development of new technology as soon as possible. Until then, EVs are very difficult to produce profitably across an entire automotive product line. Expensive luxury vehicles at the top end of a product line give an automaker the glow of an EV future, but lower-cost electric cars currently depend on government subsidies to reach mid-range consumer price points.
The truth is that with today’s EV battery technology, automakers can’t produce the affordable first car for a newly employed college grad. They also can’t make a utility van for a hard-working contractor or an SUV for a single parent juggling two jobs.
To achieve mass adoption, battery costs must come down. An EV battery involves a complex system of chemical storage that depends on an anode on one side and a cathode on the other, with a dance of lithium between the two. Multiple technologies are pushing to make a step-change in the cost of these batteries, but the road to getting new materials into a car on a dealer’s lot is long and complex.
To lower costs on the anode side of a battery, one could switch to higher-energy materials like lithium itself, or shoehorn in more high-energy silicon. Both of these approaches involve technical challenges that dozens of startup companies as well as major battery companies and universities have been working on for decades. Promising technologies in solid state anodes and nano-structured silicon, along with technology to increase the use of polymers in batteries, have combined over time to increase energy on the anode side.
With billions invested in bringing the tech to market, these innovations are just now getting tested widely in cars on the road, but this is only half of the equation.
The quest for sulfur cathodes
What has long been seen as the end-game material on the cathode side of the battery is cheap and abundant sulfur, but it has been devilishly hard to make it work. While no other realistic material on the periodic table matches it in energy potential, getting sulfur to perform to automotive specifications has been a decades-long challenge.
Where cobalt- and nickel-based batteries hold the energy of lithium in a crystal structure, sulfur contains lithium in a chemical conversion that creates by-products, making for poor battery performance. A handful of startups have pushed sulfur cathodes forward for decades but never quite produced a battery that can be third-party tested and put on the long and expensive road to being validated for an electric car.
One way to get sulfur across the “valley of death,” in the same way anode innovations are just now clawing out the other side of the valley, is to temper it in the forge of commercial-level testing. Build a sulfur battery at the same specifications needed for an automotive battery and make it fail over and over and over again. Every time you make it fail, figure out why and work around the failure mode. Combine chemistry, engineering, and innovations from universities, and you can start to push a sulfur system closer and closer to automotive performance levels.
I lead a startup company called Conamix and while we’re pushing the sulfur system and we’re tantalizingly close, we’re not yet good enough for third-party testing for automobiles.
Betting on new technology
Whether it is an innovation on the cathode side or the anode side of the battery, it still takes three to six years from third-party validation to move it to a car that a consumer can buy and drive. An automaker needs to know a new material works in ever-larger battery cells and that it can be produced in existing factories and at a truly massive scale.
The world need billions and billions of battery cells to achieve a 100% EV future. Companies like the one I founded back in 2014 are on the cutting edge of new materials that could someday change the dynamic of EV pricing worldwide. And we make only dozens of cells per day.
So there’s a gap. A promise gap — between the fully electrified future pushed by California and the reality of how hard it is to get new materials to market. Multiple technical holy grails have yet to be found and proved and pushed from the rough-and-tumble of a venture-backed startup to the scale that makes a difference for every consumer and, ultimately, for the planet as a whole.
If the world is going to have a hope of meeting these ambitious goals, we need to make big and smart bets on new technology at the same scale we make deadlines and promises.
Charlotte Hamilton is the co-founder and CEO of Conamix.
DataDecisionMakers
Welcome to the VentureBeat community!
DataDecisionMakers is where experts, including the technical people doing data work, can share data-related insights and innovation.
If you want to read about cutting-edge ideas and up-to-date information, best practices, and the future of data and data tech, join us at DataDecisionMakers.